SpaceGame
In order to show a lot of features of the NOWA-Engine. We will create a space shooter demo game.
In this space game, the player does control a space ship. The camera will be set from top to bottom. A space background will be set with several layers, which will scroll down.
Furthermore some enemy space ships will be controlled and shooting projectiles. A TimeLineComponent will be used, to spawn the space ships etc. for a given time and if the player does withstand for a specifig amount of time the combat, a boss space ship will be spawned.
The project will be composed of the following scenes:
Project: SpaceGame
- Level1.scene
- Level2.scene
- Intro.scene
- Menu.scene
- Save.scene
- Load.scene
Puh… we need to create a ton of components and describe them. I think its easier to post each component as a picture and describe some specialities.
Next component will be the ‘MyGUITextComponent’ for the score text.
– hier nun bilder einfügen und beschreiben…
Requirements:
- Visual Studio C++ with plattformtoolset v14 or higher
- PC or Laptop with Windows
Level1
Lets start with the level 1 scene, because its required for our menu. Goto to File->New and a panel appears. Specify the project name ‘SpaceGame’ and scene name ‘Level1’. Also check, that the C++ project is created. The rest of the parameters will be fine.
Now a C++ Project has also been created with a GameState as starting point for the game. Try to compile the project in Release mode and start the project exe either via visual studio or in the bin/release folder the SpaceGame.exe.
This part will be not easy, but game programming itself is not an easy task. It requires exerices in order to get better an better.
Lets start step by step.
Lets start with the space ship.
Go to the ‘Resources Panel’ under the ‘Meshes’ topic and open the ‘Vehicles’ tree and choose the ‘FutureFighterJet’ game object. Place it some where in the scene.
Note: Its also possible to search in the text edit under the ‘Meshes Topic’ for e.g. ‘jet’ or ‘Future’ and the autocompletion will list game objects, that contain this search fraction.
Create a new category ‘Player’ and press enter. Categories will be used for filtering out specifig game objects, that do collide physically in order to react properly.
Set the attribute ‘Global’ to ‘true’. This will make the space ship global, like a static variable, so that this configured space ship will be available for all levels in the game. Set the position to ‘0 0 0’, orientation to ‘0 -180 0’ and the ‘Default Direction’ to ‘0 0 1’. This direction is important. It tells NOWA, in which direction the model has been designed.
Now press either ctrl + shift + C or click the ‘C’ button on the right panel of the space ship game object and add or search for the Component: ‘Active’ which will match the ‘PhysicsActiveComopnent’. Add that component.
The physics active component, will make the space ship behave physically more realistic.
In that component set the ‘Mass’ to ‘1000’ and set the ‘Constraint Axis’ to ‘0 1 0’. This will cause, that the space ship can only be moved on the x- and z-axis. Disable the ‘Gravity’ by setting to ‘0 0 0’. Since we do not want, that our space ship will fall down.
Next, create a ‘LuaScriptComponent’, which will later be used in order to control the space ship, fire some projectiles etc.
We also want some nice particle effects. One for the jet propulsion and a smoke effect if the space ship is more and more damaged.
For that create two ‘ParticleUniverseComponent’ objects.
Name the first particle universe component ‘EngineParticle’ and the second one ‘SmokeParticle’ for better accessability in our lua script later.
For the first particle set the following attributes:
- Particle Name: propulsion
- Repeat: false
- Play Time: 0
- Play Speed: 1
- Offset Position: 0 0 -9 ->will move the particle 9 meters to the back of the space ship where the jet sits.
For the second particle set the following attributes:
- Particle Name: smoke
- Repeat: false
- Play Time: 0
- Play Speed: 10
- Offset Position: 0 1 0
We also want a sound, when the space ship is moving.
Thus create a ‘SimpleSoundComponent’, choose the ‘Sound Name’ ‘turbine1_22khz_16bit_mono_golgotha.wav’ from the ‘Audio’ folder. Set the volume to ’80’ and de-activate the sound for now.
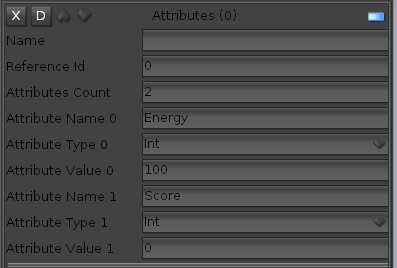
Now an important part will take place, which will matter to ‘Game-Mechanics’. Create an ‘AttributesComponent’.
In this attributes component we will specify the energy and score of the ship, which will also be used for saving and loading the game, to set this values.
Set the ‘Attribute Count’ to ‘2’ and fill in the following attributes:
Before we continue with the space ship, we first need our laser, that can be shoot.
Search in the ‘Meshes’ topic for ‘Ellipsoid’ and place the game object near the space ship.
Name the game object ‘Laser’ and create a new category ‘Laser’. Set the ‘Global’ attribute to ‘true’.
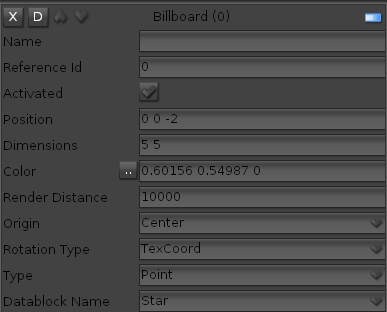
Now create a ‘BillboardComponent’ for a nice visual appereance.
Set the following attributes:
Now create a ‘PhysicsActiveComponent’ for physically correct movement of the laser.
Set the ‘Mass’ to a high value like ‘100000’. Disable the ‘Gravity’ by setting to ‘0 0 0’. Since we do not want, that our laser will fall down.
Last, create a ‘SimpleSoundComponent’ and set the ‘Sound Name’ to ‘Shoot1.wav’. Also activate the attribute ‘Relative To Listener’. So that the sound will use dolby surround an play from the corresponding loudspeaker, depending, if the space ship is more on the left side or right side. Thats it for the laser.
Lets go back to the space ship. Create a ‘SpawnComponent’ and will with the following values:
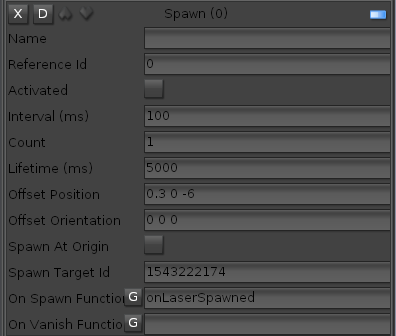
For the ‘Spawn Target Id’ choose the game object id of your laser. This will be the game object, that should be spawned. Also set the ‘OnSpawned’lua function name to ‘onLaserSpawned’. So that in our lua script, each time, the laser is spawned, this function name is called.
Note: With the interval, you can specify how many projectiles you can shoot per second. In this case at maximum 10 projectiles. Each laser will live up to 5 seconds.
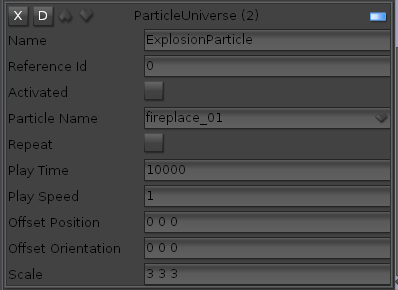
Last create another ‘ParticleUniverseComponent’, which will be played, when the space ship has no more energy left and will explode.
Now we want to have a second camera, which will be activated when the simulation starts and which has fixed coordinates and orientation and a scrolling background with several layers.
Note: The main camera is not suited for this behavior, because the main camera is mainly used for designing the game, place game objects somewhere etc. Hence its better to create a second camera, which will be activated, when the game starts.
Thus go to ‘Resources’ and open the ‘Other Resources’ tree. Choose the ‘Camera’ game object. Place it somewhere in the scene.
Note: Camera is somewhat special and has its own transform and the game object itsself has no transform attributes. Set the attribute ‘Active’ to false. Note: Using the active attribute, cameras can be switched.
Also note: As the camera game object has been created, along with that, the default PbsWorkspaceComponent has been created, because each camera must know how to render the scene.
Its also possible to delete the PbsWorkspaceComponent and choose another one.
Name the camera game object ‘GameCamera’ and set the following position ‘0 80 -35’ and orientation ‘-90 180 180’ for the camera. It will look from top to bottom. Also set ‘activated’ to false.
Note:Since the camera will never be moved, the ‘dynamic’ attribute on the game object can be set to ‘false’, which tell the Ogre-Engine, not to update the game object frequently, which results in better performance
Next kill the default ‘PbsWorkspaceComponent’, by pressing the ‘x’ button on that component.
Now press either ctrl + shift + C or click the ‘C’ button on the right panel of the camera game object and add or search for the Component: ‘Background’ which will match the ‘WorkspaceBackgroundComponent’. Add that component.
If desired for better graphics rendering, also add the component ‘HdrEffectComponent’ and play around with some effects.
More important, we want some backgrounds to scroll. For that add three times the ‘BackgroundScrollComponent’.
- Set the ‘Move Speed Y’ to 0.1 and choose the background: ‘bkgd_0.png’ from the ‘Backgrounds’ folder.
- We want a special effect for the second background. It should follow the spaceship. Set ‘Move Speed X’ to ‘0.1’ and ‘Move Speed Y’ to ‘0.2’ and choose the background: ‘bkgd_1.png’ from the ‘Backgrounds’ folder. Additionally set the ‘Target Id’ to the id of your by the player controller space ship. In my case its the ‘2248180869’ id. But in your scene, the id will be different.
- Set the same ‘Target Id’ for the third background. Set ‘Move Speed X’ to ‘0.1’ and ‘Move Speed Y’ to ‘0.05’ and choose the background: ‘bkgd_2.png’ from the ‘Backgrounds’ folder. The most far away background layer will move more slowely.
Last create a ‘SimpleSoundComponent’ for our background music.
Set the Sound name to ‘Juhani Junkala [Retro Game Music Pack] Level 2.wav’. Also set ‘Loop’ to ‘true’ and ‘Stream’ to ‘true’.
Note: Longer sounds, music should be streamed instead of loading the whole big file into the buffer at once. This will avoid jitter when the menu state is loaded and is more performant and less memory hungry.
Before we continue, lets finish our lua script for the space ship, so that you can control and test the ship’s behavior
Open the futureFighterJet´lua file with the ZeroBrane Studio.
Before we start writing some lua code. I will explain some yet pre-configured codings.
Take a look the the first line: module(“FutureFighterJet_0”, package.seeall);
This line is really important! It allows, that each game object can have its own script and environment, instead of a static script, which would affect all game objects.
Its like, this script is just used for this game object logo instance!
Also the global script require(“init”); is also already included, which here is not necessary yet, but does not harm.
Next, there are also some lua script table functions already available:
- connect: Is called, when the simulation is started, this function is called, which is good for setting some attributes properly.
- disconnect: Is called, when the simulation has ended and useful to tidy up some attributes.
Optional:
- update: Is called with the parameter dt (delta time) in milliseconds, if the developer wants to simulate something. This function is called for alle game objects before the rendering has taken place.
- lateUpdate: Is called, after all physics, inputs, game objects have been updated and is called just before the rendering. This should only be used in order to move a camera manually etc. to prevent some visual artifacts.
Open also the ‘init.lua’ configuration file in ZeroBrane studio.
In this file, some things can be done, which will be available for all lua scripts!
The init file contains already two useful functions:
- Random: A good random function to use for lua scripts.
- Dump: A possibility to dump a game object or component, or a table of game objects etc. in order to see all yet set data for debugging.
Usage:
log("----->Dump: " .. dump(felsites));
We will register in this script a custom event, called ‘RemoveLaser’. Let me explain something about lua events. This events are really useful and are working together with the NOWA event system. You can specify, that at a specifig point, an event is triggered in a script and create a listener for this kind of event in a another script, to react on this event. This pattern is powerful, as lua scripts are loosely coupled. This is, lua script A does not know lua script B. Lua script A triggers an event and lua script B just reacts on this event.
Create the following event:
AppStateManager:getScriptEventManager():registerEvent("RemoveLaser");
Now lets start creating some variables in the futureFighterJet lua script, which are required for this script. Write them outside the functions:
attributesComponent = nil;

physicsActiveComponent = nil;

cameraComponent = nil;

cameraGameObject = nil;

flySound = nil;

timeSinceLastLaserShoot = 0.2;

canShoot = false;

laserSpawnComponent = nil;

originLaser = nil;

thisGameObject = nil;
I hope you recognize those variables. We just use yet evertyhing, that we configured in our components so far.
Note: Really important, it may be that your lua script is named a bit different as in this tutorial, e.g. ‘Level1_FutureFighterJet_0’. Please use your naming! Else the script will not work. Also take care, that your table: FutureFighterJet_0 = {}; has your correct naming, as this is the initialization for all table functions.
Next create the ‘connect’ function with the following content:
FutureFighterJet_0["connect"] = function(gameObject)

    thisGameObject = AppStateManager:getGameObjectController():castGameObject(gameObject);
PointerManager:showMouse(false);
physicsActiveComponent = thisGameObject:getPhysicsActiveComponent();
attributesComponent = thisGameObject:getAttributesComponent();
laserSpawnComponent = thisGameObject:getSpawnComponent();
laserSpawnComponent:setActivated(false);
laserSpawnComponent:setKeepAliveSpawnedGameObjects(true);
originLaser = AppStateManager:getGameObjectController():getGameObjectFromId("1543222174");
originLaser:setVisible(false);
timeSinceLastLaserShoot = 0.2;
flySound = thisGameObject:getSimpleSoundComponent();
flySound:setVolume(80);
flySound:setActivated(true);
cameraGameObject = AppStateManager:getGameObjectController():getGameObjectFromName("GameCamera");
cameraComponent = cameraGameObject:getCameraComponent();
cameraComponent:setCameraPosition(Vector3(0, 80, -35));
cameraComponent:setCameraDegreeOrientation(Vector3(-90, 180, 180));
cameraComponent:setActivated(true);
if (EventType.RemoveLaser ~= nil) then
AppStateManager:getScriptEventManager():registerEventListener(EventType.RemoveLaser, FutureFighterJet_0["onRemoveLaser"]);
end
end
First I will describe something new. You see the line with the casting function? This is optional and will help ZeroBrane Studio for its autocompletion, to have the correct type.
Because lua is typeless and if just using the game object from the function. If you press ‘gameObject.’, ZeroBrane cannot recognize which type you mean. By casting via the function ‘castGameObject’ and assign to our local variable, ZeroBrane now knows the type!
The next line will hide our mouse
Notice the code line: ‘laserSpawnComponent:setKeepAliveSpawnedGameObjects(true);’. This function tells the spawn component, that if further lasers are spawned, do not destroy the yet living lasers in the scene.
All other lines are for initialization. We get our game object and some necessary components to work with.
Take care when you get your laser game object, that you use the correct id. Take a look in NOWA-Design to get your laser id!
In the last three lines we register an event listener, for the event ‘RemoveLaser’. We will react in this script, when the laser has been removed in another lua script, because the laser does belong to the space ship, so its handled in this script. We will react in the function ‘onRemoveLaser’ of your FutureFighterJet_0 or ‘Level1_FutureFighterJet_0’ depending what your script is called.
Next we fill the ‘disconnect’ function with life:
FutureFighterJet_0["disconnect"] = function()

    PointerManager:showMouse(true);
flySound:setActivated(false);
--cameraComponent:setCameraPosition(Vector3(0, 160, -35));
laserSpawnComponent:setActivated(false);
originLaser:setVisible(true);
thisGameObject:getParticleUniverseComponentFromName("SmokeParticle"):setActivated(false);
thisGameObject:getParticleUniverseComponentFromName("SmokeParticle"):setPlaySpeed(10);
thisGameObject:getParticleUniverseComponentFromName("ExplosionParticle"):setActivated(false);
thisGameObject:setVisible(true);
cameraComponent:setActivated(false);
AppStateManager:getGameObjectController():getGameObjectFromName("MainCamera"):getCameraComponent():setActivated(true);
end
In summary, we do the opposide of the ‘connect’ function. We reset the states. This really important, because when you do test your game inside the NOWA-Design and you press play to test the game and stop, to go back to the editor mode, you want, that everything is resetted. Else you will get ugly side effects, when e.g. you forgot to deactivate a particle effect and each time when pressing the play button, suddenly a particle effect is played etc.
Now lets control the space ship, via the following function:
FutureFighterJet_0["update"] = function(dt)
local moveHorizontal = 0;
local moveVertical = 0;
local speed = 20;
if InputDeviceModule:isActionDown(NOWA_A_UP) then
moveVertical = -1;
elseif InputDeviceModule:isActionDown(NOWA_A_DOWN) then
moveVertical = 1;
end
if InputDeviceModule:isActionDown(NOWA_A_LEFT) then
moveHorizontal = -1;
elseif InputDeviceModule:isActionDown(NOWA_A_RIGHT) then
moveHorizontal = 1;
end
if InputDeviceModule:isActionDown(NOWA_A_MENU) then
AppStateManager:pushAppState("MenuState");
end
flySound:setPitch(0.2 + physicsActiveComponent:getForce():length() * 0.01);
physicsActiveComponent:setBounds(Vector3(boundsLeft, 0.0, boundsTop), Vector3(boundsRight, 0.0, boundsBottom));
local movement = Vector3(moveHorizontal, 0, moveVertical);
physicsActiveComponent:applyRequiredForceForVelocity(movement * speed);
physicsActiveComponent:applyOmegaForceRotateTo(Quaternion(Degree(180), Vector3.UNIT_Y), Vector3.UNIT_Y, 100);
-- Add some decline
local vel = physicsActiveComponent:getVelocity();
physicsActiveComponent:applyOmegaForce(Vector3(0, 0, -vel.x * 0.01));
shoot(dt);
end
For the control, we use the ‘InputDeviceModule’ and actions like ‘NOWA_A_UP’. This actions can be configured in a menu and if you have an external controller or game pad, it will also react automatically! This is the most generic way of mapping device independent inputs to actions.
Depending which action took place, we set the ‘moveHorizontal’ or ‘moveVertical’ states.
If the menu action has been pressed, we push the (not yet created) ‘MenuState’ on the top of this game state.
For our fly sound, we calculate the sound pitch, depending on the current space ship force, which will distort the sound in a nice manner.
Next we set some border behavior, so that the ship will not vanish out of the screen.
For that go to the ‘init.lua’ file and add the following constants:
boundsLeft = -90

boundsRight = 90

boundsBottom = 30

boundsTop = -90
This constants will be also used later for our boss movement, so that it will remain in scene. This bounds are used for our future fighter yet physics active component, so that its only possible to move the ship within this bounds.
After that, we create a local movement vector and apply the required for the velocity vector, which is the movement vector multiplied with the space ship speed.
Note: Since we are using physics engine with physics active component, we work with forces. Its also possible to move a ship by using just velocity, but do not do this! Velocity should only be used for initialization etc. because else, the collision system etc. will not work property. A physics engine does work with forces!
In order to work also with velocities, ‘PhysicsActiveKinematic’ components are required. Those components are easier to use, but do not react on forces. They can be used for artificial intelligent game objects, in which the movement should be less chaotic. Or move some game objects along mathematical functions. Later we will also use physics active kinematic components for the enemy movement!
Now we will examine this code line:
physicsActiveComponent:applyOmegaForceRotateTo(Quaternion(Degree(180), Vector3.UNIT_Y), Vector3.UNIT_Y, 100);
Without this line, it could happen, that the spaceship will rotate away, especially if it has collided with another game object. In order to prevent this, we will udjust the orientation force frequently.
After that, we will decline the space ship a bit, when moving from left to right and vice versa.
In the last line, we call our not yet examined ‘shoot’ function, in order to shoot the laser.
Lets dig deeper in our ‘shoot’ function:
function shoot(dt)

    if timeSinceLastLaserShoot >= 0 then

		timeSinceLastLaserShoot = timeSinceLastLaserShoot - dt;

	end
if timeSinceLastLaserShoot <= 0 then
if InputDeviceModule:isActionDown(NOWA_A_ATTACK_1) == false then
canShoot = true;
end
if InputDeviceModule:isActionDown(NOWA_A_ATTACK_1) and canShoot == true then
laserSpawnComponent:setActivated(true);
canShoot = false;
timeSinceLastLaserShoot = 0.2;
end
end
--log("-->can shoot: " .. (canShoot and 'true' or 'false'));
end
We want to shoot a laser, but not to frequently and only if the shoot action button has been pressed each time. We do not want to have auto fire!.
Hence we check if the ‘timeSinceLastLaserShoot’ is positive and if it is, we decrement by delta time between two calls of this function.
After that, we check that the attact action is not pressed and set ‘canShoot’ to ‘true’. If we can shoot, we activate the ‘laserSpawnComponent’, which will spawn our laser and set the ‘timeSinceLastLaserShoot’ to 200 milliseconds again, so that we just can shoot, if those 200 milliseconds have past away. You can also activate the last log line, to inspect the bool variable.
But if we start our game, the laser will be spawned, but will yet not fly, because this peace of code is still missing.
Fortunately, we created in the NOWA-Design in the spawn component the reaction to the ‘On Spawned Function’ and entered ‘onLaserSpawned’, which will be called each time our laser has been spawned.
FutureFighterJet_0["onLaserSpawned"] = function(spawnedLaserGameObject, originGameObject)

    local laserBillboard = spawnedLaserGameObject:getBillboardComponent();

    laserBillboard:setActivated(true);

    local shootSound = spawnedLaserGameObject:getSimpleSoundComponent();

    shootSound:setActivated(true);

    spawnedLaserGameObject:getPhysicsActiveComponent():applyRequiredForceForVelocity(Vector3(0, 0, -100));

end
First we get our laser billboard and activate it. After that we get and activate the shoot sound.
Last we apply the required force for felocity by -100 along the z-axis to move the laser from the bottom to top screen.
Now lets implement the reaction, when a laser should be removed, triggered by another lua script (which has not been implemented yet).
FutureFighterJet_0["onRemoveLaser"] = function(eventData)

	local id = eventData["laserId"];

	--log("###onRemoveLaser: " .. id);

    AppStateManager:getGameObjectController():deleteGameObject(id);

end
Get the laser id from the event data and call ‘deleteGameObject’ for this id.
Note: Deleting the game object is save for use, because spawned lasers are volatile. But keep in mind, that our origin laser must not be deleted! But we took care about that, by making the laser invisible. We could also check, if we are the origin laser and do nothing, if this is the case. If game objects shall be deleted, which are persistent (part of the NOWA-Design) scene, those game objects would be gone after each simulation test. Thats sad, but for this, you could use the following code snipped:
if (Core:isGame() == true) then

    AppStateManager:getGameObjectController():deleteGameObject(myId);

else

    AppStateManager:getGameObjectController():deleteGameObjectWithUndo(myId);

end
If we are in the real game and not in the NOWA-Editor, we can savily delete the game object. If we are in NOWA-Design editor state, delete it, but with undo, so when the simulation test is stopped, the game object will become available again.
Thats it for the space ship script. Go back to the NOWA-Design editor and start the game and check for lua errors, which will appear in the top middle of the screen. If there are some errors, click with the mouse on that header and a dialog will be openend, to inform, what has going wrong. You can also use the log file, which is located in the ‘GameEngineDevelopment\bin\resources’ folder.
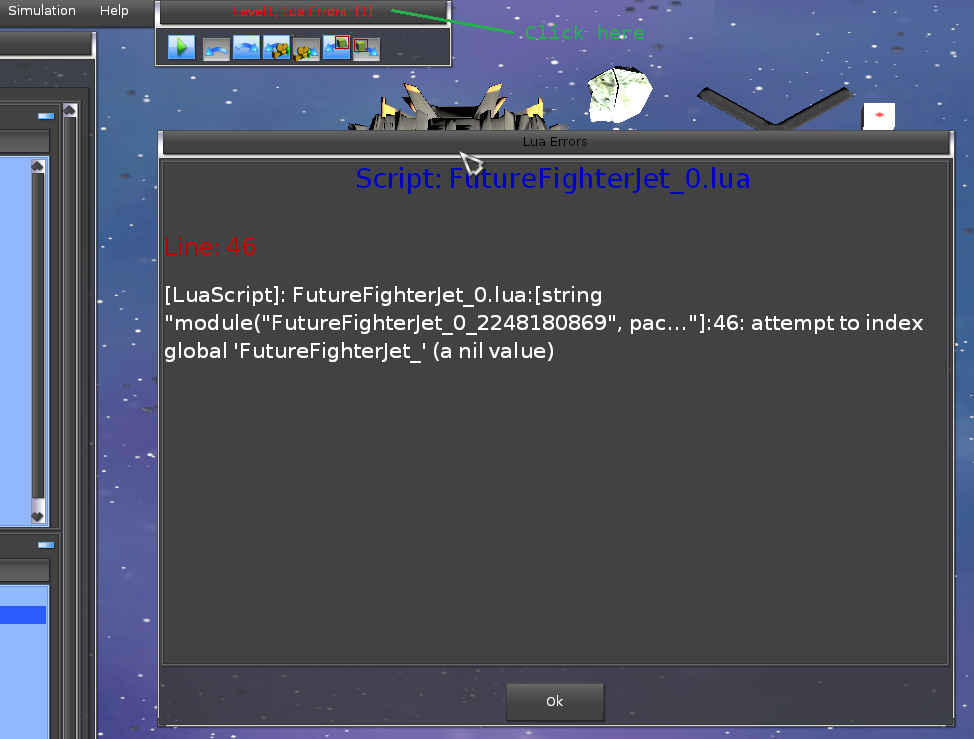
In this example, the situation in line 46, the table for ‘FutureFighterJet_’ is unknown. There is the ‘0’ missing.
Note: Depending in which line a runtime exception occurs, the lua script will stop at this line! Everything, that has happen up to this line, took already place, like setting some states etc. E.g. if you have an error in the ‘update’ function. The update function is called each time til this error, but some considered behavior inside the NOWA-Engine, will prevent log flooding and calling this function again and again for the same error. If an exception does occur e.g. in the ‘connect’ function, it may be that some components are already activated and the state will become inconsistent. But thats not as bad, as it sound. Fix the error, start the simulation and stop the simulation, so that the ‘disconnect’ is called and will reset all activations etc. properly and leading to a consistent state again.
Enemies
In the following, we will concentrate in creating some enemies.
We will use the main game object, for spawning all enemies and we also will use a time line component, to organize, when and about what amount of time which enemy is spawned. The advantage of this approach is, that we just need one lua script component for the enemies and since we also will use the physics collision system to react, when e.g. an enemy collided with the player or with the laser, we can do this in this script!
Lets start with randomly generated asteroids.
First, create the mesh ‘stone_felsite7.mesh’ and place it somewhere in the scene.
Create a new category called ‘Enemy’ and the tag name ‘Stone’.
Note: Tags are like sub-categories. E.g. several game objects may belong to the category ‘Enemy’, but one group may have a tag name ‘Stone’, the other ‘Ship1’, ‘Ship2’ etc. This is useful when doing ray-casts on graphics base or physics base or creating physics materials between categories, to further distinquish, which tag has been hit in order to remove different energy amount. This is also a good approach, since due to performance reasons its only possible to create up to 31, but one is already reserved as the ‘Default’ category. Hence only 30 categories are possible. So combining those with tag names, the count will suffice!
Set the position to ‘-20 0 -100’.
Now create a ‘PyhsicsActiveComponent’ and remove the gravity by setting to ‘0 0 0’. Also constraint the axis to ‘0 1 0’.
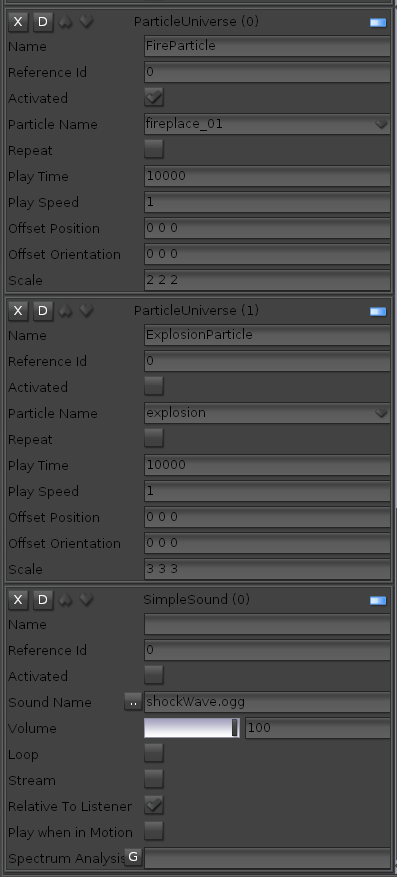
After that create two ‘ParticleUniverseComponent’ objects and a ‘SimpleSoundComponent’ and configure as shown in the picture below:

Our next enemy is an ufo, which will fly along a mathematical function and also shoot at us!
First we will create the laser, because the ufo will be dependant of this laser.
Create the ‘box.mesh’ and place it somewhere in the scene.
Create a new category ‘EnemyLaser’ and the tag name ‘LaserShip1’.
Set the coordinates to approx. :-4.32992 0 -90.6841′. Scale the laser at the following axes values: ‘1 1 5’.
Now I will introduce a new nice component in order to style the visualisation of the laser a bit. We will create a transparent red laser.
Create the ‘DatablockPbs’-Component.
Info: Ogre uses since the version 2 physically based shading, which is a complex topic at itself. There is a lot of literature in the internet. Here are some links:
Set the attribute ‘Brdf’ to ‘BlinnPhong’, the diffuse color to ‘1 0 0’ (red), the transparency mode to ‘Transparent’ and transparence strength to 0.7.
Next create a simple sound component and active ‘Relative to Listener’ and set the sound name ‘Laser1.wav’.
After that create a ‘PhysicsActiveKinematic’-Component. This component behaves similiar to a physics active component, but it does not react to forces! This is what we want! We do not want, that the laser would e.g. collide with a asteroid and falsify the direction of the laser.
A kinematic component has also no gravity attribute.
Set the max speed to 150.
Last create a particle universe component and configure as follows:
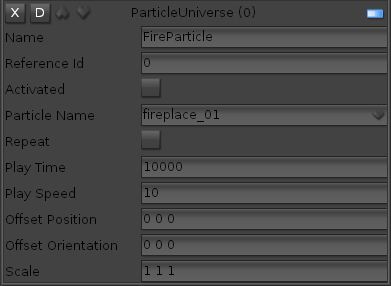
The laser should look as follows:

Next create the game object ‘UfoVShape’. Place it at e.g. ‘-4.36881 0 -96.8168’. Set the default direction to ‘0 0 -1’, since it has been modeled in this local transform space orientation.
Choose the already created category ‘Enemy’ and set the tag name to ‘Ship1’. Orientate it in the direction to the player ‘0 180 0’.
Create a physics active component and set the gravity to ‘0 0 0’.
Create also a lua script component, because this ship needs some logic at its own, in order to fire lasers at us.
Set the attribute ‘Has Common Script’ to ‘true’. I will explain this attribute, as its really important!
Several game object may use the same script, if the script name for the lua script components is the same. This is useful if they should behave the same. This also increases the performance. Also for example when the game object is cloned, the lua script component is cloned too, but referencing the original lua script file.
In our case a lot of enemy ufo’s will be spawned and all will behave the same, hence will using this one common lua script file.
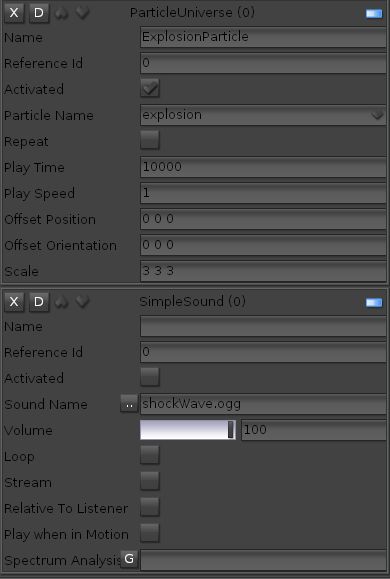
Next create a physics universe and a simple sound component and configure as follows:
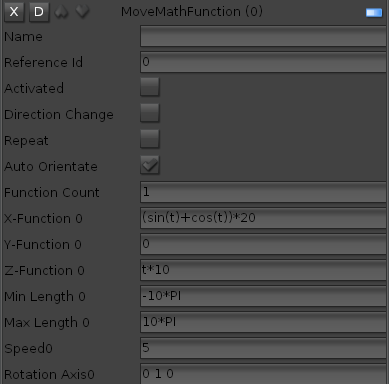
Now comes a more complicated part. The movement of the ship. Create a ‘MoveMathFunctionComponent’ and configure as follows:
Now I will describe, what is going on.
The move math function component alows a game object to move along a mathematical function, with some additional configuration.
There are 3 functions possible, for each axis one function. The variable t is is volatile and will run from ‘min length’ to ‘max length’.
Its also possible to create several math functions, which will run sequently one after another.
We use the x-function:
(sin(t)+cos(t))*20
Which lets the ship move in a zik-zak way.
The z-function is set to:
t*10
Which lets the ship move from the top to bottom screen.
Last, we need also a spawn component, because this ship will shoot lasers.
Hence create this component and configure as shown below:
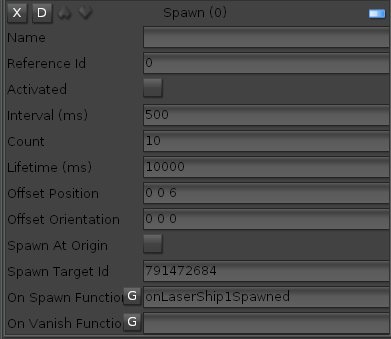
The enemy ufo will spawn lasers, hence set your ‘Target Id’ to the id of the created laser game object.
Ok lets switch to the ‘Level1_UfoVShape_0.lua’ script.
We need two member variables, the origin laser, from which we will created copies and the laser spawn component:
originLaser = nil;

laserSpawnComponent = nil;
Using the ‘connect’ function, we initialize all variables and set some startup states:
Level1_UfoVShape_0["connect"] = function(gameObject)

    originLaser = AppStateManager:getGameObjectController():getGameObjectFromId("791472684");

    originLaser:setVisible(false);

    originLaser:getPhysicsActiveKinematicComponent():translate(Vector3(0, -5, 0));

    laserSpawnComponent = gameObject:getSpawnComponent();

end
Note: As usual, take care about the name of your lua script, it may differ from the on in this tutorial! Also look in NOWA-Design about the laser id, it will be different from ‘791472684’.
The origin laser will be moved away from the scene and set visible to false.
In ‘disconnect’ we will tidy up everything again.
Level1_UfoVShape_0["disconnect"] = function()

    originLaser:getPhysicsActiveKinematicComponent():translate(Vector3(0, 5, 0));

    originLaser:setVisible(true);

end
Next I will introduce a quite new function called ‘cloned’.
Level1_UfoVShape_0["cloned"] = function(gameObject)

    -- Activate spawning, only just when the ship1 has been cloned

    laserSpawnComponent = gameObject:getSpawnComponent();

    laserSpawnComponent:setActivated(true);

    laserSpawnComponent:setKeepAliveSpawnedGameObjects(true);

end
This function is called when the enemy ufo has been spawned. Each time its cloned, we get the laser spawn component of the currently new cloned ufo and active the the component, so that it will start shooting lasers as soon as the ufo is cloned.
Each time the spawn component is activated, the in NOWA-Design configured lua spawn function ‘onLaserShip1Spawned’ is called.
Level1_UfoVShape_0["onLaserShip1Spawned"] = function(spawnedLaserGameObject, originGameObject)

    spawnedLaserGameObject:setVisible(true);

    local shootSound = spawnedLaserGameObject:getSimpleSoundComponent();

    shootSound:setActivated(true);

    local direction = originGameObject:getOrientation() * originGameObject:getDefaultDirection();

    -- clamp to y 0 the flight direction, so that the laser can hit the player

    direction = direction * Vector3(1, 0, 1);

    spawnedLaserGameObject:getPhysicsActiveKinematicComponent():setVelocity(direction * spawnedLaserGameObject:getPhysicsActiveKinematicComponent():getSpeed());

    spawnedLaserGameObject:getPhysicsActiveKinematicComponent():setOmegaVelocity(direction);

end
As soon as the laser is spawned, the shoot sound is activated. The direction determined (its the same as the direction origin game object (the ufo). The ‘y’-axis is removed from the direction, so that it will just fly on x-, z-axis. Now, since the laser has a physics active kinematic component, its valid to use velocity for translation and omega velocity for rotation.
Health package
Now lets take care filling up energy for our space ship. For that create the mesh resource ‘Health.mesh’ and place it near an enemy ufo.
Choose or create the category ‘Item’ and set the tag name to ‘Health’. This will later be used for our collision detection, to find out, if our spaceship collided with a health package.
Next create a ‘PhysicsActiveKinematicComponent’ and a ‘SimpleSoundComponent’. Choose the sound name ‘Health.wav’ and deactivate the sound for now.
We also want a boss enemy to fight. But before we invent one, lets first build up our flying game play scenario, the status bar and some common components.
Hence lets now concentrate at the ‘MainGameObject’. It will have the most game object components. So I will list an image for each component and describe some specialties.
Each scene does have already a ‘MainGameObject’ it also cannot be deleted. Select the ‘MainGameObject’ in the left game object tree.
First create a ‘LuaScriptComponent’ and set the ‘Lua Script Name’ to ‘Level1_MainGameObject.lua’.
We also create a simple graphical user interface in order to display energy, points etc.
For that create a ‘MyGUIWindowComponent’ and configure like in the picture below.
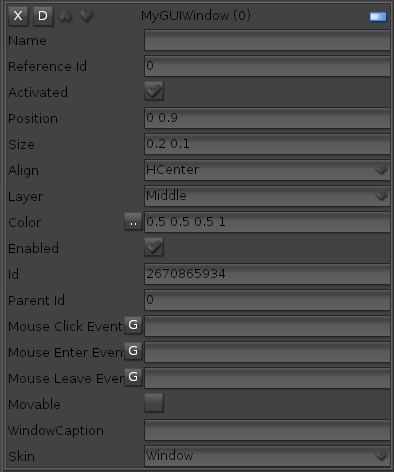
Place it in the left down corner by setting the relative position to ‘0 0.9’ and the size to ‘0.2 0.1’. Now it will be covered by the manipulation bar of the level editor. But the status bar can be hidden, by pressing Ctrl + h
In the following we will place the score text in the status bar, hence the status bar is the parent of the score text and the text will be positioned and sized relative to its parent.

Important, set the parent id of the score text to the id of your ‘MyGUIWindowComponent’!
Also name the component ‘ScoreText’, so that it can be identified easier in a lua script.
Next create a ‘MyGUIScrollBarComponent’ in order to show the current energy.

Same as for the score text, set the parent id to the id of your ‘MyGUIWindowComponent’. The max energy value is set to 100, but later you could increase this value, if e.g. your spacehip collected a special item!
We also need an energy label, which points to the progress bar.

Later via game mechanics, if the space ship has no energy left, a ‘Game Over’ message will be shown, hence create the ‘MyGUITextComponent’ for that and set it to ‘visible = false’.
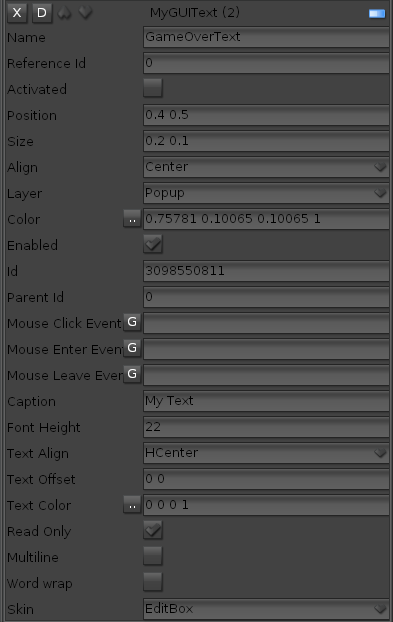
Note:The game over text has no parent id, it will be just placed int he middle of the screen.
Thats it for our simple status bar
Gameplay with time line
For our game play mechanics we will use a ‘TimeLineComponent’ with which we can specify what should happen at which point of time and for how long.
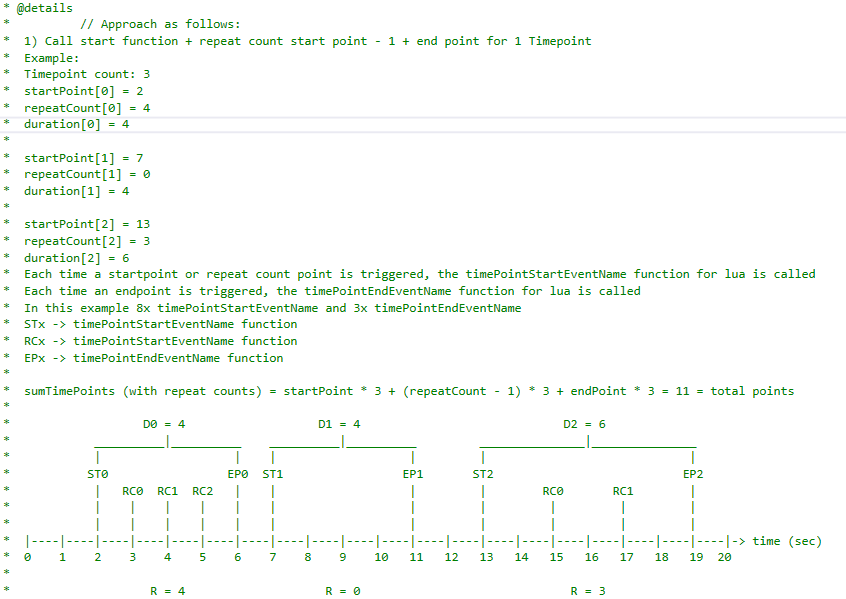
The time line component does work the following way. First we set a time point count. For each time point, we specify the start time and the duration in seconds and a repeat count.
Each time point will be activated after the duration of the prior time point and will be actived for the specified duration. There are also two lua event names, which can be set and will be called. The ‘Lua Start Event’ will be called once the start time has passed and optionally as often as set in the repeat count. The ‘Lua End Event’ will be called either after the duration has passed. Its not that easy to understand. Hence take a look at the following time line example snipped and analyse it carefully to get an idea, how this component does work.
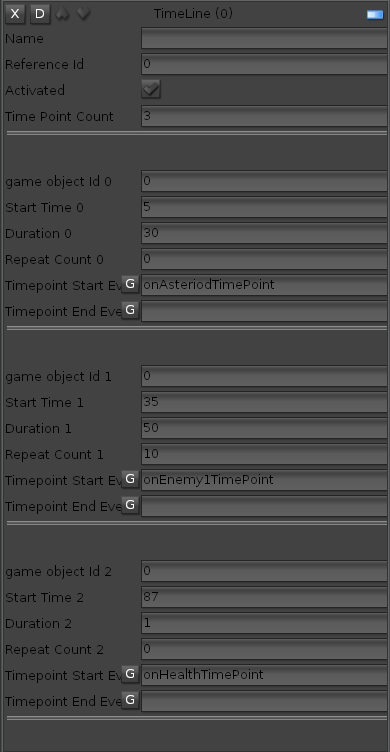
For our space game, we create three time points. The first for spawning the asteroids the first time after 5 seconds and for a duration of 30 seconds. In this case we will not use a repeat count, because we spawn them randomly.
Next after 35 seconds we will start to spawn the ufo’s for 50 seconds and repeat the ‘onEnemy1TimePoint’ 10 times. That is each 5 seconds.
After 87 seconds we will spawn the health package.
Now the next three components will spawn some already pre-created game objects
Lets start with the asteroids. Create a ‘SpawnComponent’ and call it ‘asteroidSpawn’.
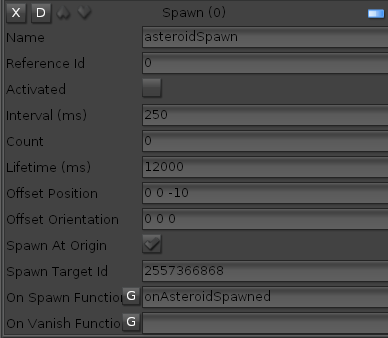
It will be spawned out of the visible view port ‘0 0 -10’ and the spawn target id is set asteroid, we created above. We will react on the lua event function ‘onAsteroidSpawned’ in the main game object lua script.
The next spawn component will spawn the ufo game objects.

This component does behave the similiar way as the asteroid spawn component. Again, set the correct spawn target id, of your origin ufo.
The last spawn component will be our health package.
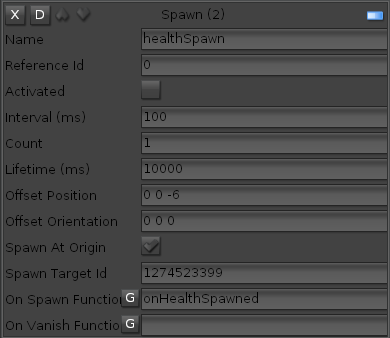
It will be spawned just once in this example.
Last we create some ‘PhysicsMaterialComopnents’ in order to react in lua script, when some game objects of different categories and tags do collide.
First create a ‘PyhsicsMaterialComponent’ between the category ‘Enemy’ and the ‘Layer’, which we created for our space ship.
We will react in lua script, when our laser hit an enemy.

Note: There are 4 different kinds of trigger, we can react in lua script
- Overlap Function Name: Will be called as soon as the bounding boxes of the two game objects are overlapping.
- Contact Function Name: Will be called as soon as the two physics collision hulls hit each other. Note, this functions are called on each contact point.
- Contact Once Function Name: Will be called the same way as the ‘Contact Function Name’, but only once!
- Contact Scratch Function Name: Will be called when a game object is being pulled (scratched) on another game object.
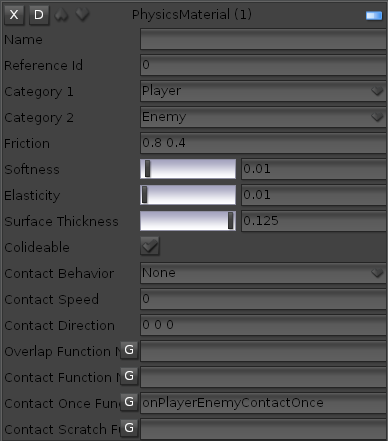
The next ‘PhysicsMaterialComponent’ will be acting between the ‘Player’ and the ‘Enemy’, when the enemy crashed into our ship or vice versa.
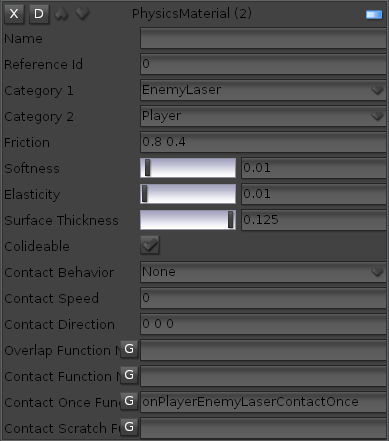
The next one between ‘EnemyLaser’ and ‘Player’, when the laser of an enemy ship hit our ship.
The next one between ‘Player’ and the ‘Item’, in this case our health package.

The last one is between the ‘EnemyLaser’ and ‘Enemy’. In this case remove the check from ‘Collideable’, so that the enemy laser will never collide with an enemy. This is necessary, because if a laser would e.g. collide with the enemy itself, the enemy ship could be interrupted and bounce away.
Info: Its always a good idea, to set for all origin GameObjects, which do spawn itself, the ‘collideable’ attribute to false, so that the player will not hit this origin GameObject by accident.
Main game object lua script
The main game object lua script will contain all game mechanics for the level1. Lets describe bit by bit what is happing in this script.
Open your main game object lua script e.g. in ZeroBrane Studio.
First we need the following variables, that will exist for this script.
thisGameObject = nil

originAsteroid = nil;

originEnemy1 = nil;

originHealth = nil;

asteroidSpawn = nil;

enemy1Spawn = nil;

healthSpawn = nil;

energyProgress = nil;

scoreText = nil;

energy = nil;

score = nil;

gameOverText = nil;
Next in the ‘connect’ function we initialize all variables and set values for our small user interface.
Level1_MainGameObject["connect"] = function(gameObject)

    thisGameObject = AppStateManager:getGameObjectController():castGameObject(gameObject);

    asteroidSpawn = thisGameObject:getSpawnComponentFromName("asteroidSpawn");

    asteroidSpawn:setActivated(false);

    asteroidSpawn:setKeepAliveSpawnedGameObjects(true);
enemy1Spawn = thisGameObject:getSpawnComponentFromName("enemy1Spawn");
enemy1Spawn:setActivated(false);
enemy1Spawn:setKeepAliveSpawnedGameObjects(true);
healthSpawn = thisGameObject:getSpawnComponentFromName("healthSpawn");
healthSpawn:setActivated(false);
local figherJet = AppStateManager:getGameObjectController():getGameObjectFromId("2248180869");
energy = figherJet:getAttributesComponent():getAttributeValueByName("Energy");
score = figherJet:getAttributesComponent():getAttributeValueByName("Score");
energyProgress = thisGameObject:getMyGUIProgressBarComponent();
energyProgress:setValue(energy:getValueNumber());
scoreText = thisGameObject:getMyGUITextComponentFromName("ScoreText");
scoreText:setCaption("Score: " .. toString(score:getValueNumber()));
gameOverText = AppStateManager:getGameObjectController():getGameObjectFromId(MAIN_GAMEOBJECT_ID):getMyGUITextComponentFromName("GameOverText");
gameOverText:setActivated(false);
-- Set default values, and if maybe a game is loaded, the values will be overwritten
energy:setValueNumber(100);
score:setValueNumber(0);
-- Load a possible save game
local success = AppStateManager:getGameProgressModule():loadProgress(Core:getCurrentSaveGameName());
originAsteroid = AppStateManager:getGameObjectController():getGameObjectFromId("2557366868");
originAsteroid:setVisible(false);
originAsteroid:getPhysicsActiveComponent():translate(Vector3(0, -5, 0));
originEnemy1 = AppStateManager:getGameObjectController():getGameObjectFromId("2217483413");
originEnemy1:setVisible(false);
originEnemy1:getPhysicsActiveComponent():translate(Vector3(0, -5, 0));
originHealth = AppStateManager:getGameObjectController():getGameObjectFromId("1274523399");
originHealth:setVisible(false);
originHealth:getPhysicsActiveKinematicComponent():translate(Vector3(0, -5, 0));
end
Note:Remember not to use the id’s in this code snipped but look up your ids! E.g. you will have a different id for your fighterjet as in this example.
Note:I’m showing different ways of getting components. For example:
gameOverText = AppStateManager:getGameObjectController():getGameObjectFromId(MAIN_GAMEOBJECT_ID):getMyGUITextComponentFromName("GameOverText");

// Is the same as:

gameOverText = thisGameObject:getMyGUITextComponentFromName("GameOverText");
Note: Using ‘ AppStateManager:getGameObjectController()’ is a bit of type work but not avoidable, as the NOWA-Engine is using a state machine in order to create different levels. Hence when accessing the game object controller its the one on the top of the stack! If there are several states (level1, level2, saveGameState, etc.), then there are also e.g. several GameObjectController.
We now also load a saved game, if it does exist via this command:
local success = AppStateManager:getGameProgressModule():loadProgress(Core:getCurrentSaveGameName());
Last we set the translate the positions of all origin game objects by y to -5 meters, so that they will not collide e.g. with a laser. We also hide them.
Next is the ‘disconnect’ function, in which we reset everything, in order to start the next ‘connect’ function in a clean way, if in NOWA-Design the play button is pressed again.
Level1_MainGameObject["disconnect"] = function()

    asteroidSpawn:setActivated(false);

    enemy1Spawn:setActivated(false);

    healthSpawn:setActivated(false);

    originAsteroid:setVisible(true);

    originEnemy1:setVisible(true);

    originHealth:setVisible(true);

    energy:setValueNumber(100);

    energyProgress:setValue(energy:getValueNumber());

    score:setValueNumber(0);

    scoreText:setCaption("Score: " .. toString(score:getValueNumber()));

    gameOverText:setActivated(false);

end
After that we will fill our prior specified time points from the ‘TimePointComponent’ with life.
What we do is simple, we just activate the corresponding spawn components.
Level1_MainGameObject["onAsteriodTimePoint"] = function(timePointSec)

    asteroidSpawn:setActivated(true);

end
Level1_MainGameObject["onEnemy1TimePoint"] = function(timePointSec)
asteroidSpawn:setActivated(false);
enemy1Spawn:setActivated(true);
end
Level1_MainGameObject["onHealthTimePoint"] = function(timePointSec)
enemy1Spawn:setActivated(false);
healthSpawn:setActivated(true);
end
Now we fill all prior specified spawn event functions with life.
Level1_MainGameObject["onAsteroidSpawned"] = function(spawnedGameObject, originGameObject)

    spawnedGameObject:setVisible(true);

    spawnedGameObject:getPhysicsActiveComponent():setPosition(Vector3(math.random(-100, 100), 0, -150));

    spawnedGameObject:getPhysicsActiveComponent():setOrientation(Quaternion(Degree(math.random(180)), Vector3.UNIT_Y));

    local direction = Vector3(math.random(-0.5, 0.5), 0, math.random(1));

    spawnedGameObject:getPhysicsActiveComponent():applyRequiredForceForVelocity(direction * 100);

end
Level1_MainGameObject["onEnemy1Spawned"] = function(spawnedGameObject, originGameObject)
spawnedGameObject:setVisible(true);
spawnedGameObject:getPhysicsActiveComponent():setPosition(Vector3(math.random(-140, 140), 0, -130));
spawnedGameObject:getMoveMathFunctionComponent():setActivated(true);
end
Level1_MainGameObject["onLaserSpawned"] = function(spawnedLaserGameObject, originGameObject)
local laserBillboard = spawnedLaserGameObject:getBillboardComponent();
laserBillboard:setActivated(true);
local shootSound = spawnedLaserGameObject:getSimpleSoundComponent();
shootSound:setActivated(true);
spawnedLaserGameObject:getPhysicsActiveComponent():applyRequiredForceForVelocity(Vector3(0, 0, -100));
end
Level1_MainGameObject["onHealthSpawned"] = function(spawnedGameObject, originGameObject)
spawnedGameObject:setVisible(true);
spawnedGameObject:getPhysicsActiveKinematicComponent():setPosition(Vector3(math.random(-100, 100), 0, -130));
spawnedGameObject:getPhysicsActiveKinematicComponent():setVelocity(Vector3(0, 0, 25));
end
Our asteroids will be spawned at random position in random orientation and also fly in a random direction.
Last our contact events will be described, which have been specified in the ‘PhysicsMaterialComponents’.
Lets start when our space jet laser collided with an enemy.
Level1_MainGameObject["onEnemyLaserContactOnce"] = function(gameObject0, gameObject1, contact)

    contact = AppStateManager:getGameObjectController():castContactData(contact);
local thisLaser = nil;
local thisEnemy = nil;
if gameObject0:getCategory() == "Enemy" then
thisEnemy = gameObject0;
thisLaser = gameObject1;
else
thisEnemy = gameObject1;
thisLaser = gameObject0;
end
thisEnemy:setVisible(false);
thisEnemy:getPhysicsActiveComponent():translate(Vector3(0, -5, 0));
thisEnemy:getSimpleSoundComponent():setActivated(true);
thisEnemy:getParticleUniverseComponentFromName("ExplosionParticle"):setActivated(true);
thisEnemy:getPhysicsActiveComponent():setActivated(false);
AppStateManager:getGameObjectController():deleteDelayedGameObject(thisEnemy:getId(), 3);
score:setValueNumber(score:getValueNumber() + 20);
scoreText:setCaption("Score: " .. toString(score:getValueNumber()));
local eventData = {};
eventData["laserId"] = thisLaser:getId();
AppStateManager:getScriptEventManager():queueEvent(EventType.RemoveLaser, eventData);
end
First we cast the contact data, so that the type is recognized for ZeroBrane and we can use the auto complete functionality.
Next we need to determine which game object is which.
Because the enemy collided with the laser, we hide the enemy, translate it away from the scene, start an explosion particle and delete the enemy after 3 seconds.
Note:Delete later with a delay of 3 seconds is used, so that the particle effect has time to play!
We also increase our score!
The last 3 Lines are important and need further explanation. We use an event system, because here we are in the lua script of the main game object, but in our future fighter jet lua script, we need also to react, when a laser hit the enemy. Hence we use the NOWA internal event system, in order to communicate loosely coupled between different lua scripts!
Remember, as I describe above. In the ‘init.lua’ we can register events and now we fire the ‘RemoveLaser’ event. The future fighter jet lua script will subscribe to that event, in the following way:
FutureFighterJet_0["connect"] = function(gameObject)

    ...

    if (EventType.RemoveLaser ~= nil) then

		AppStateManager:getScriptEventManager():registerEventListener(EventType.RemoveLaser, FutureFighterJet_0["onRemoveLaser"]);

	end

end
And react in the following way:
FutureFighterJet_0["onRemoveLaser"] = function(eventData)

	local id = eventData["laserId"];

	--log("###onRemoveLaser: " .. id);

    AppStateManager:getGameObjectController():deleteGameObject(id);

end
Note: The event is not necessary, but if the futher fighter jet wants to add some logic, it can do this in this function. E.g. fill a buffer for the next laser to shoot!
Lets get back to the main game object lua script and describe the next contact between an enemy and the player (our ship).
Level1_MainGameObject["onPlayerEnemyContactOnce"] = function(gameObject0, gameObject1, contact)
local thisPlayer = nil;
local thisEnemy = nil;
-- Decrease energy
if gameObject0:getCategory() == "Player" then
thisPlayer = gameObject0;
thisEnemy = gameObject1;
else
thisPlayer = gameObject1;
thisEnemy = gameObject0;
end
if (thisEnemy:getTagName() == "Stone") then
energy:setValueNumber(energy:getValueNumber() - 2);
elseif (thisEnemy:getTagName() == "Ship1") then
energy:setValueNumber(energy:getValueNumber() - 5);
end
energyProgress:setValue(energy:getValueNumber());
if (energy:getValueNumber() < 50 and energy:getValueNumber() > 20) then
thisPlayer:getParticleUniverseComponentFromName("SmokeParticle"):setActivated(true);
else
thisPlayer:getParticleUniverseComponentFromName("SmokeParticle"):setPlaySpeed(20);
end
if (energy:getValueNumber() <= 0) then gameOverText:setActivated(true); thisPlayer:getParticleUniverseComponentFromName("ExplosionParticle"):setActivated(true); thisPlayer:setVisible(false); end --log("----->Dump: " .. dump(felsites));
thisEnemy:setVisible(false);
thisEnemy:getPhysicsActiveComponent():translate(Vector3(0, -5, 0));
--thisEnemy:setScale(Vector3(0.1, 0.1, 0.1));
thisEnemy:getSimpleSoundComponent():setActivated(true);
thisEnemy:getParticleUniverseComponentFromName("ExplosionParticle"):setActivated(true);
thisEnemy:getPhysicsActiveComponent():setActivated(false);
-- Do not delete directly, because a particle effect needs time to play
AppStateManager:getGameObjectController():deleteDelayedGameObject(thisEnemy:getId(), 3);
end
Again we first determine which game object is which and what is now new, we also determine via the tag name which sub-category the enemy does belong to. Depending on the category we decrease a different amount of energy for our player ship!
If the energy is lower as 50% but higher as 20% we activate the the smoke particle effect in order to signal, that our spaceship is damaged. If the energy is lower as 20%, we increase the particle effect speed to warn the user, that the spaceship could explode!
We also remove the enemy and play an explosion particle effect.
Next we lets examine the enemy laser and player contact, that is when the laser of an enemy hit our ship. It will behave in a similar way as the contact above.
Level1_MainGameObject["onPlayerEnemyLaserContactOnce"] = function(gameObject0, gameObject1, contact)

    local thisPlayer = nil;

    local thisEnemyLaser = nil;
-- Decrease energy
if gameObject0:getCategory() == "Player" then
thisPlayer = gameObject0;
thisEnemyLaser = gameObject1;
else
thisPlayer = gameObject1;
thisEnemyLaser = gameObject0;
end
thisEnemyLaser:getParticleUniverseComponentFromName("FireParticle"):setActivated(true);
thisEnemyLaser:setVisible(false);
thisEnemyLaser:getPhysicsActiveKinematicComponent():translate(Vector3(0, -5, 0));
if (thisEnemyLaser:getTagName() == "LaserShip1") then
energy:setValueNumber(energy:getValueNumber() - 10);
end
if (energy:getValueNumber() < 50 and energy:getValueNumber() > 20) then
thisPlayer:getParticleUniverseComponentFromName("SmokeParticle"):setActivated(true);
else
thisPlayer:getParticleUniverseComponentFromName("SmokeParticle"):setPlaySpeed(20);
end
energyProgress:setValue(energy:getValueNumber());
if (energy:getValueNumber() <= 0) then gameOverText:setActivated(true); thisPlayer:getParticleUniverseComponentFromName("ExplosionParticle"):setActivated(true); thisPlayer:setVisible(false); end AppStateManager:getGameObjectController():deleteDelayedGameObject(thisEnemyLaser:getId(), 3); end
Last lets investigate, when the player ship collided with the health package.
Level1_MainGameObject["onPlayerHealthContactOnce"] = function(gameObject0, gameObject1, contact)

    local thisPlayer = nil;

    local thisHealth = nil;
-- Increase energy
if gameObject0:getCategory() == "Player" then
thisPlayer = gameObject0;
thisHealth = gameObject1;
else
thisPlayer = gameObject1;
thisHealth = gameObject0;
end
thisHealth:getPhysicsActiveKinematicComponent():translate(Vector3(0, -5, 0));
thisHealth:getSimpleSoundComponent():setActivated(true);
thisHealth:setVisible(false);
if (thisHealth:getTagName() == "Health") then
energy:setValueNumber(energy:getValueNumber() + 40);
end
if (energy:getValueNumber() > 100) then
energy:setValueNumber(100);
end
energyProgress:setValue(energy:getValueNumber());
AppStateManager:getGameObjectController():deleteDelayedGameObject(thisHealth:getId(), 2);
end
In this case we increase our energy and remove the health package from the scene.
Thats it with our main game mechanics.
If you are ready lets start with our boss fight game mechanics! Click here.