boss
In this chapter we will concentrate on the boss fight! It will be not an easy task, but I’m sure that we can handle it!
We will use a nice design pattern for the boss artificial intelligence, which is called: The state pattern. If you are not familiar with the state pattern. Take a look on wiki etc. In summary, the state pattern enables better organisation of behaviors, forming a more complex behavior. Each state has its task and transitions between states are possible.
We will have several states, like ‘ShootState’, ‘AppearState’, ‘Move1State’, ‘Move2State’, ‘Move3State’. The ship will also possess a shield, which the player must first destroy by shooting three times at it, before the boss ship actually can be hit.
First create the ‘MotherShip2.mesh’ and place it at the coordinates -50 2.15 -150. Note: I played a bit with the coordinates, because we want, that the boss ship is first outside the scene and shall appear slowely at the right moment.
Set the category to ‘Enemy’ and the ‘Tag Name’ to ‘Boss’.
Set the orientation to 0 -180 0 and the default direction to 0 0 -1
Next create a physics active component, set the mass to a high value (10000) and remove the gravity by setting the vector to 0 0 0.
Furthermore set all speed values to 20 and the constraint axis to 0 1 0, so that the ship’s y-axis is constrained and hence the ship can only be moved on x-, z-axis.
Next, we create a joint component, since this boss will have to cannons, which will be jointed with the space ship.
After that, create a lua script component
Now in order to use the state pattern, create an ‘AiLuaComponent’. This one makes it possible to create and manage own developed states in lua.
Deactivate the fly mode and set the rotation speed to 0.1. Now we need to specify prior the first state, that shall be executed, when this component gets activated. In this case, its the ‘AppearState’. Thus, write down ‘AppearState’ for the ‘Start State Name’ attribute.
Next, create a ‘MoveMathFunctionComponent’. This component will be used in a state, in order to move the boss in a circle. Fill in the following values:
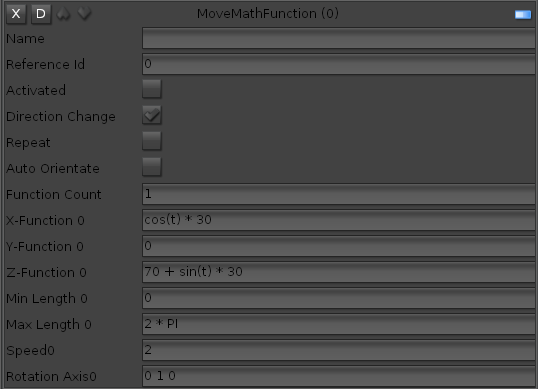
With this function, the boss will move in a circle by 70 meters offset on y-axis and with 30 meters radius from 0 degree to 360 degree (0 to 2 PI).
A speciality is also, that the auto orientation is deactivated, so that the boss will always be orientation at z = -1.
Next create a simple sound component. Deactivate the component and set the sound name to ‘shockWave.ogg’.
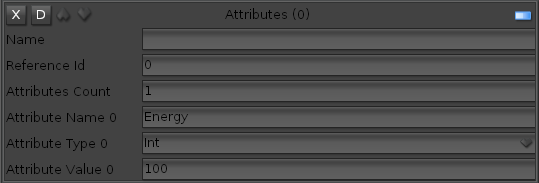
Now, we create an attribute component, which will store the energy of the boss:
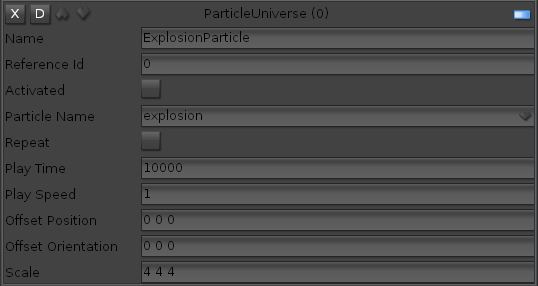
Also create a particle universe component and set the following values:
The last two components, will be responsible for showing the energy as value bar and text, so that the player can see, how much damage he added to the boss.
Create the components showing on the picture below:
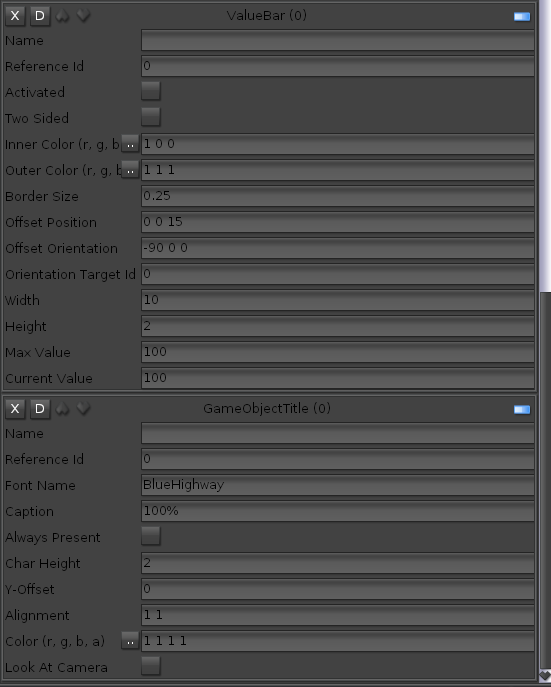
I will explain some attributes now. We want to have the value bar at the top of the boss space ship. But since the ship is huge, the offset position is set to 0 0 15 meters and the offset orientation to -90, 0, 0. Now you may ask, why 15 in z+ direction? This is because I orientated the value bar at x: -90, which does influence the transform axis. You may play around with different values.
The max and current value is set to 100, like in the attributes component the value of the energy.
The game object title component, will show the current energy text.
In the next chapter we will create two cannons, which will be jointed with the boss ship. They will rotate forward and backward and each cannon will shoot two lasers.
Add the ‘SpaceGun2.mesh’ to the scene and place it two times like in the picture below:
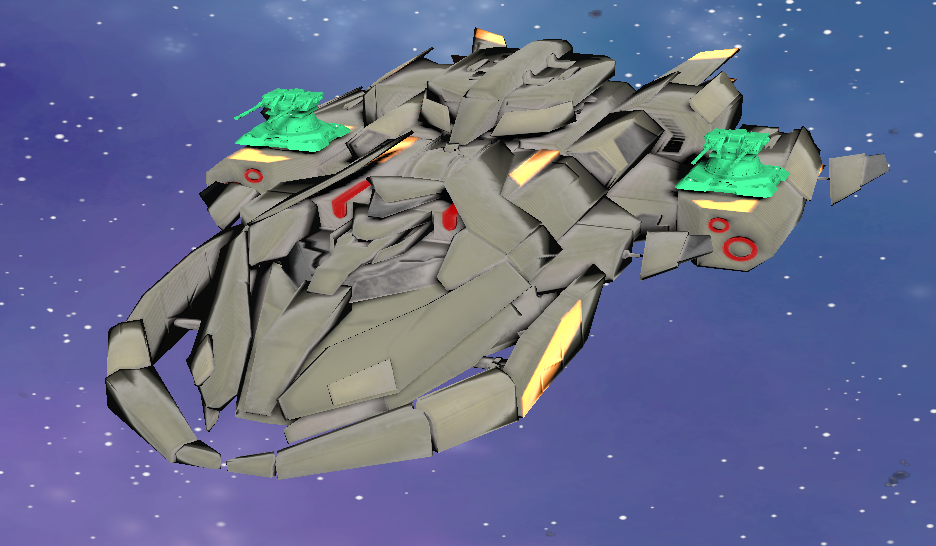
Note, that the cannons do not like like in the picture yet, but we will change that in a second.
Select both cannons and set the category to ‘Enemy’ and the tag name to ‘MotherShipCannon’.
Scale both cannons by factor 2 2 2 and set the default direction to 0 0 1
Next create a physics active component and remove the gravity by setting to 0 0 0
Note: Remember, that our boss ship has a joint root component and joints only work with a kind physics active components, not with physics kinematic components!
Now we will joint the cannons to the spaceship and let rotate each cannon from left to right. For this purpose, the ‘JointHingeActuatorComponent’ is the correct component to use.
Add those component to each cannon and set the following values:
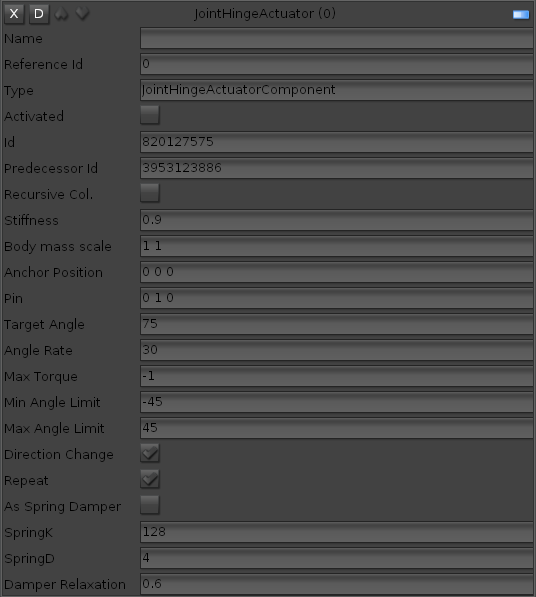
Note: Set the predecessor id, to the joint component of your boss space ship, as its different than the one in the picture.
Read all set attributes carefully, they should be self explained.
Now we want to change the display of the cannons, so that the look as in the picture above. For that we use the ‘DatablockPbsComponent’, which does the phyically based shading.
Configure the component as in the picture below:
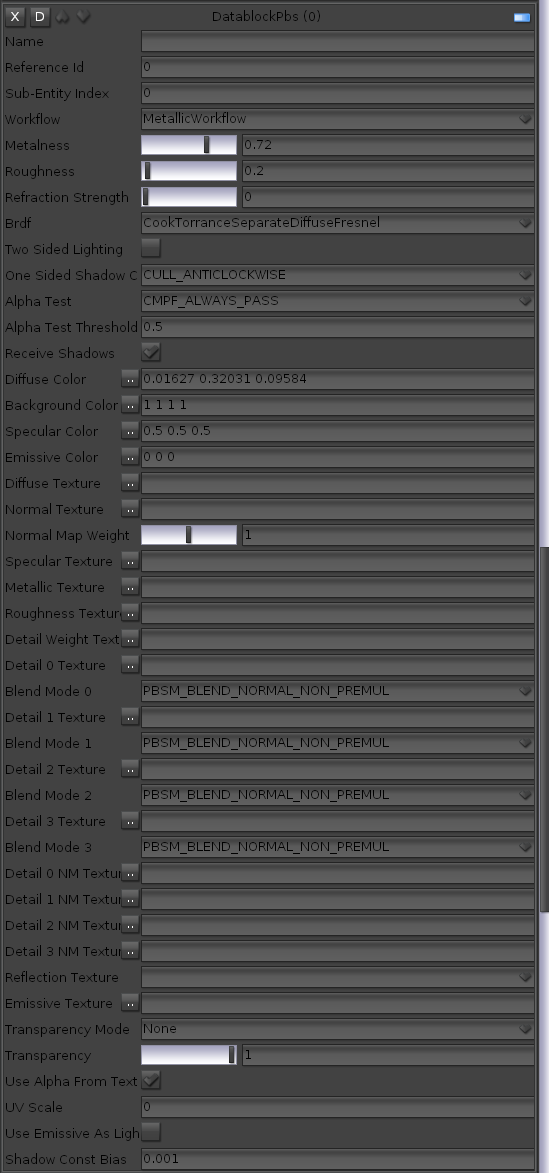
There are a lot of attributes which can be customized, be only want to change the diffuse color to 0.01627 0.32031 0.09584.
Set also the workflow to ‘metallic’. You can also play with the metallness value.
After that create a lua script component, which will take care about the laser shooting later. Important: Set the attribute ‘Has Common Script’ to true, because the two cannons will share one lua script!
At last, create two spawn components for each cannon, each one will be responsible for shooting a laser from the left hole and the other one from the right hole. Configure them as follows:

Note: The spawn target id for each spawn component for the two cannons must be the laser, we created earlier in this tutorial.
Now we create a shield for the boss ship. The player must first destroy the shield, after that he can put damage to the ship. The shield will be invisible and just appearing, when the player ship’s laser hit the shield.
Add the elliptic.mesh to the scene. Scale it by factor 20 30 50 and place it around the boss ship.
Create also a new category ‘Shield’.
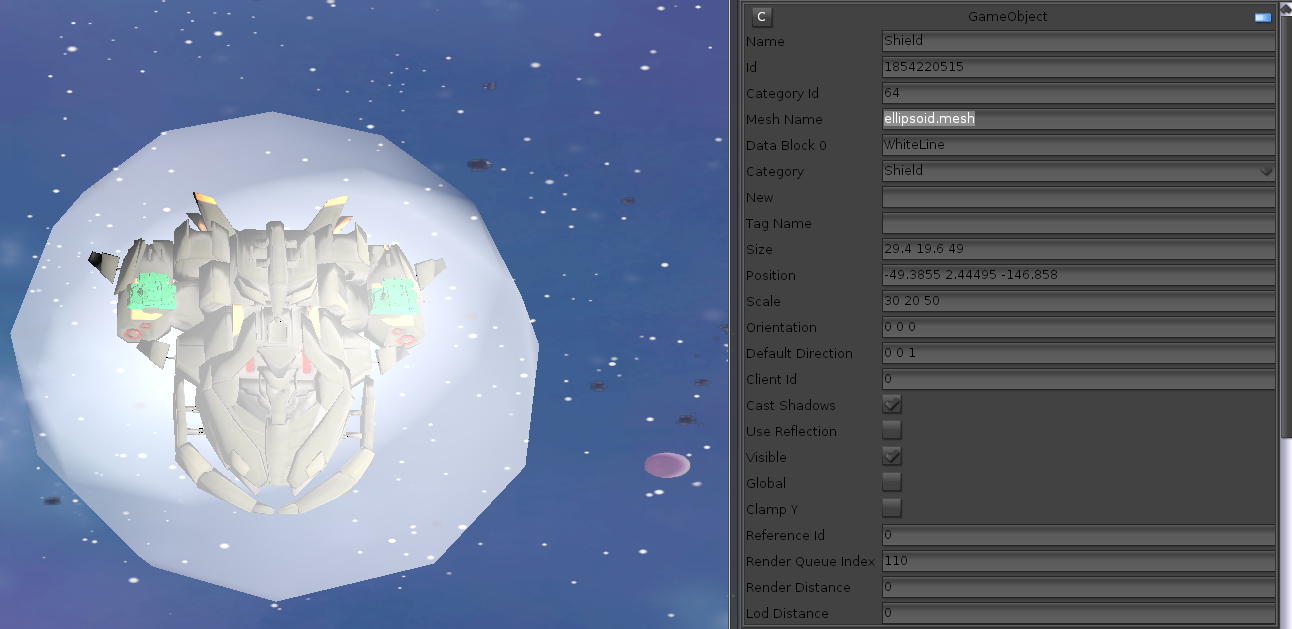
Now in order to make our shield invisible, create a ‘DatablockPbsComponent’. Set the transparency value to 0 and the transparency mode to ‘Transparent’.
Next create a component, I have not described so far. Its call the ‘AttributeEffectComponent’. With this component, its possible to control any attribute of a prior component by mathematical function.

The attribute effect component does work as follows. Specify the attribute name of the prior component you wish to manipulate. In this case its the attribute ‘Transparency’ of the ‘DatablockPbsComponent’.
After that, set the math function. We want to let appear the shield, by decreasing the transparency by ‘sin(x) / 10’ from 0 to 2 * PI. This lets the shield appear and disappear after short amount of time.
Furthermore we need a ‘PhysicsActiveComponent’. Remove the gravity by setting to 0 0 0.
The shield should have always the same position as the boss space ship.
For that, create a ‘JointTargetTransformComponent’ and set as ‘PredecessorId’ the id of the ‘JointComponent’ of the boss space ship. For that select in the left tree the MotherShip2_0 and copy the id of the joint component.
Last, create an ‘AttributesComponent’ and set the following values:

Thats it for our boss components. Now select the ‘MainGameObject’, because we need to extend the main game object by some new ‘PhysicsMaterialComponet”s.
Create a ‘PhysicsMaterialComponent’. Set the category 1 to ‘Enemy’ and the category 2 to ‘Shield’. Remove the ‘Collideable’ check, so that the enemy and the shield will not collide!
Create two more ‘PhysicsMaterialComponent’s and configure as in the picture below:
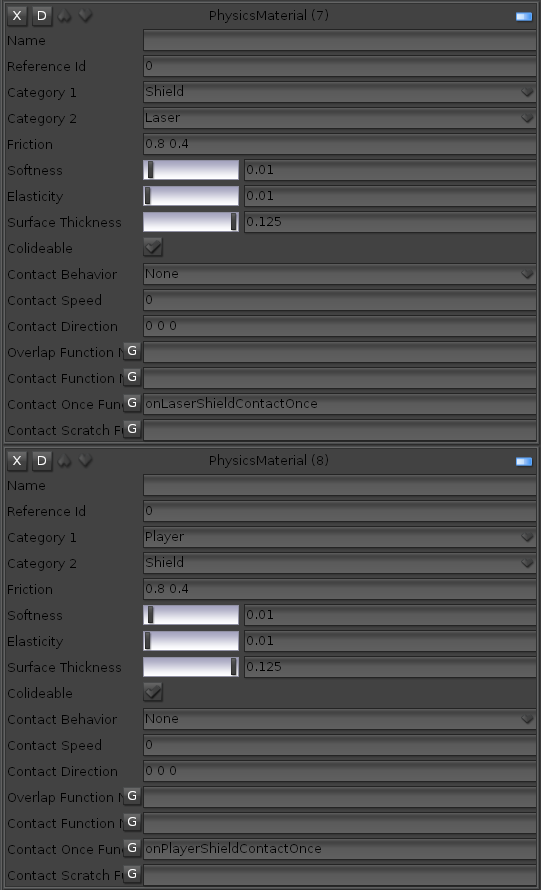
In lua script of the main game object, we will react when the laser of the player ship hit the shield. Hence write down the lua function ‘onLaserShieldContactOnce’ and click on ‘G’, in order to generate the function in lua script.
Also in the same lua script, we will react when the player hit the shield. Hence write down the lua function ‘onPlayerShieldContactOnce’ and click on the ‘G’ button.
Now we will concentrate on the main game object lua script and extend the script.
First create all the required variables:
boss1 = nil;

boss1LeftCanon = nil;

boss1RightCanon = nil;

boss1AiLua = nil;

boss1Shield = nil;

boss1ShieldAttributeEffect = nil;

boss1ShieldEnergy = nil;
First create an init function, which resets everything. This function will be used in the ‘connect’ and ‘disconnect’ function:
function init()

    figherJet:getPhysicsComponent():setCollidable(true);

    asteroidSpawn:setActivated(false);

    enemy1Spawn:setActivated(false);

    healthSpawn:setActivated(false);

    boss1:setVisible(true);

    boss1:getPhysicsComponent():setCollidable(true);

    boss1Shield:setVisible(true);

    boss1Shield:getPhysicsComponent():setCollidable(true);

    boss1ShieldEnergy:setValueNumber(30);

    boss1AiLua:setActivated(false);

    boss1ShieldAttributeEffect:setActivated(false);
boss1LeftCanon:getJointHingeActuatorComponent():setActivated(false);
boss1LeftCanon:getSpawnComponentFromName("LeftLaserSpawn"):setActivated(false);
boss1LeftCanon:getSpawnComponentFromName("RightLaserSpawn"):setActivated(false);
boss1RightCanon:getJointHingeActuatorComponent():setActivated(false);
boss1RightCanon:getSpawnComponentFromName("LeftLaserSpawn"):setActivated(false);
boss1RightCanon:getSpawnComponentFromName("RightLaserSpawn"):setActivated(false);
gameOverText:setActivated(false);
-- Set default values, and if maybe a game is loaded, the values will be overwritten
energy:setValueNumber(100);
score:setValueNumber(0);
energyProgress:setValue(energy:getValueNumber());
scoreText:setCaption("Score: " .. toString(score:getValueNumber()));
end
Info: It can now be more complex and confusing, since our script will be extended, take a look in the downloaded files in the main game object script, how everything is solved. Keep in mind, that you may have different id’s for game objects and components, as in this example!
In the ‘connect’ function init everything that concerns the boss:
Level1_MainGameObject["connect"] = function(gameObject)

    thisGameObject = AppStateManager:getGameObjectController():castGameObject(gameObject);

    asteroidSpawn = thisGameObject:getSpawnComponentFromName("asteroidSpawn");

    asteroidSpawn:setKeepAliveSpawnedGameObjects(true);
enemy1Spawn = thisGameObject:getSpawnComponentFromName("enemy1Spawn");
enemy1Spawn:setKeepAliveSpawnedGameObjects(true);
healthSpawn = thisGameObject:getSpawnComponentFromName("healthSpawn");
figherJet = AppStateManager:getGameObjectController():getGameObjectFromId("2248180869");
energy = figherJet:getAttributesComponent():getAttributeValueByName("Energy");
score = figherJet:getAttributesComponent():getAttributeValueByName("Score");
-- New
boss1 = AppStateManager:getGameObjectController():getGameObjectFromId("481476523");
boss1:setVisible(true);
boss1AiLua = boss1:getAiLuaComponent();
boss1LeftCanon = AppStateManager:getGameObjectController():getGameObjectFromId("2663873632");
boss1RightCanon = AppStateManager:getGameObjectController():getGameObjectFromId("2673984934");
boss1LeftCanon:setVisible(false);
boss1RightCanon:setVisible(false);
boss1AiLua = boss1:getAiLuaComponent();
boss1Shield = AppStateManager:getGameObjectController():getGameObjectFromId("1854220515");
boss1ShieldAttributeEffect = boss1Shield:getAttributeEffectComponent();
boss1ShieldAttributeEffect:reactOnEndOfEffect(function()
boss1ShieldAttributeEffect:setActivated(false);
end, false);
boss1ShieldEnergy = boss1Shield:getAttributesComponent():getAttributeValueByName("Energy");
energyProgress = thisGameObject:getMyGUIProgressBarComponent();
energyProgress:setValue(energy:getValueNumber());
scoreText = thisGameObject:getMyGUITextComponentFromName("ScoreText");
scoreText:setCaption("Score: " .. toString(score:getValueNumber()));
gameOverText = AppStateManager:getGameObjectController():getGameObjectFromId(MAIN_GAMEOBJECT_ID):getMyGUITextComponentFromName("GameOverText");
-- Load a possible save game
local success = AppStateManager:getGameProgressModule():loadProgress(Core:getCurrentSaveGameName());
originAsteroid = AppStateManager:getGameObjectController():getGameObjectFromId("2557366868");
originAsteroid:setVisible(false);
originAsteroid:getPhysicsActiveComponent():translate(Vector3(0, -5, 0));
originEnemy1 = AppStateManager:getGameObjectController():getGameObjectFromId("2217483413");
originEnemy1:setVisible(false);
originEnemy1:getPhysicsActiveComponent():translate(Vector3(0, -5, 0));
originHealth = AppStateManager:getGameObjectController():getGameObjectFromId("1274523399");
originHealth:setVisible(false);
originHealth:getPhysicsActiveKinematicComponent():translate(Vector3(0, -5, 0));
timeLine = thisGameObject:getTimeLineComponent();
-- Test setting timeline to last boss
timeLine:setCurrentTimeSec(93)
init()
end
What is new in the ‘connect’ function, is that the we use our prior created shield attribute effect. We react also, when the effect has played completely with the function ‘ShieldEndEffect’.
In the ‘disconnect’ function, everything is deactivated:
Level1_MainGameObject["disconnect"] = function()

    init()
originAsteroid:setVisible(true);
originEnemy1:setVisible(true);
originHealth:setVisible(true);
timeLine:setCurrentTimeSec(0);
end
Now also create the following function, which will be used in this script on several places:
function checkGameOver()

    if (energy:getValueNumber() <= 0) then
        gameOverText:setActivated(true);
        figherJet:getParticleUniverseComponentFromName("ExplosionParticle"):setActivated(true);
        figherJet:setVisible(false);
        figherJet:getPhysicsComponent():setCollidable(false);
    end
end

function levelCleared()
    thisGameObject:getCompositorKeyholeComponent():setActivated(true);
    local keyholeAttributeEffect = thisGameObject:getAttributeEffectComponent();
    keyholeAttributeEffect:reactOnEndOfEffect(thisGameObject, "LevelClearedEffect", false);
    keyholeAttributeEffect:setActivated(true);
end

Level1_MainGameObject["LevelClearedEffect"] = function(result)
	AppStateManager:popAppState();
end
The first function checks for game over. That is, if the player ship has no energy anymore left. If this is the case an explosion effect is played and the fighter jet hidden and will no more collide.
The next function will be called, when the boss has been defeated.
The next function is called, when the energy shield has been shown and hidden again. We deactivate the effect again.
Now again, we have some time points, at which something happens. We extend by the new time point, when the boss shall appear:
Level1_MainGameObject["onAsteriodTimePoint"] = function(timePointSec)

    asteroidSpawn:setActivated(true);

end
Level1_MainGameObject["onEnemy1TimePoint"] = function(timePointSec)
asteroidSpawn:setActivated(false);
enemy1Spawn:setActivated(true);
end
Level1_MainGameObject["onHealthTimePoint"] = function(timePointSec)
enemy1Spawn:setActivated(false);
healthSpawn:setActivated(true);
end
Level1_MainGameObject["onBoss1TimePoint"] = function(timePointSec)
boss1:setVisible(true);
boss1LeftCanon:setVisible(true);
boss1LeftCanon:getJointHingeActuatorComponent():setActivated(true);
boss1RightCanon:setVisible(true);
boss1RightCanon:getJointHingeActuatorComponent():setActivated(true);
boss1AiLua:setActivated(true);
end
In this case we activate the cannons and the physics rotating behavior.
Next we react when our laser hit the enemy and extend the function, in order to react also when the boss ship has been hit:
Level1_MainGameObject["onEnemyLaserContactOnce"] = function(gameObject0, gameObject1, contact)

    contact = AppStateManager:getGameObjectController():castContactData(contact);
local thisLaser = nil;
local thisEnemy = nil;
if gameObject0:getCategory() == "Enemy" then
thisEnemy = gameObject0;
thisLaser = gameObject1;
else
thisEnemy = gameObject1;
thisLaser = gameObject0;
end
local eventData = {};
eventData["laserId"] = thisLaser:getId();
AppStateManager:getScriptEventManager():queueEvent(EventType.RemoveLaser, eventData);
thisLaser:getPhysicsComponent():setCollidable(false);
if (thisEnemy:getTagName() == "MotherShipCannon") then
return;
end
if (thisEnemy:getTagName() == "Boss") then
local bossEnergy = thisEnemy:getAttributesComponent():getAttributeValueByName("Energy");
bossEnergy:setValueNumber(bossEnergy:getValueNumber() - 10);
local valueBarComponent = thisEnemy:getValueBarComponent();
valueBarComponent:setCurrentValue(bossEnergy:getValueNumber());
local energyText = thisEnemy:getGameObjectTitleComponent();
energyText:setCaption(toString(bossEnergy:getValueNumber()) .. "%");
--log("--->energy: " .. bossEnergy:getValueNumber());
if (bossEnergy:getValueNumber() <= 0) then local bossLeftCanon = AppStateManager:getGameObjectController():getGameObjectFromId("2663873632"); bossLeftCanon:setVisible(false); bossLeftCanon:getSpawnComponent():setActivated(false); local bossRightCanon = AppStateManager:getGameObjectController():getGameObjectFromId("2673984934"); bossRightCanon:setVisible(false); bossRightCanon:getSpawnComponent():setActivated(false); thisEnemy:setVisible(false); valueBarComponent:setActivated(false); thisEnemy:getPhysicsActiveComponent():translate(Vector3(0, -50, 0)); thisEnemy:getSimpleSoundComponent():setActivated(true); thisEnemy:getParticleUniverseComponentFromName("ExplosionParticle"):setActivated(true); thisEnemy:getPhysicsActiveComponent():setActivated(false); --thisEnemy:disconnect(); levelCleared(); end else thisEnemy:getPhysicsComponent():setCollidable(false); thisEnemy:setVisible(false); thisEnemy:getPhysicsActiveComponent():translate(Vector3(0, -5, 0)); thisEnemy:getSimpleSoundComponent():setActivated(true); thisEnemy:getParticleUniverseComponentFromName("ExplosionParticle"):setActivated(true); thisEnemy:getPhysicsActiveComponent():setActivated(false); AppStateManager:getGameObjectController():deleteDelayedGameObject(thisEnemy:getId(), 3); end score:setValueNumber(score:getValueNumber() + 20); scoreText:setCaption("Score: " .. toString(score:getValueNumber())); end
Important is, that we deactivate the collision for our laser, as soon as something has been hit.
We also check, if the boss has energy left and if not, we deactivate the boss.
After that, we react when our space ship itself hit the enemy.
Level1_MainGameObject["onPlayerEnemyContactOnce"] = function(gameObject0, gameObject1, contact)
local thisPlayer = nil;
local thisEnemy = nil;
-- Decrease energy
if gameObject0:getCategory() == "Player" then
thisPlayer = gameObject0;
thisEnemy = gameObject1;
else
thisPlayer = gameObject1;
thisEnemy = gameObject0;
end
if (thisEnemy:getTagName() == "Stone") then
energy:setValueNumber(energy:getValueNumber() - 2);
elseif (thisEnemy:getTagName() == "Ship1") then
energy:setValueNumber(energy:getValueNumber() - 5);
end
energyProgress:setValue(energy:getValueNumber());
if (energy:getValueNumber() < 50 and energy:getValueNumber() > 20) then
thisPlayer:getParticleUniverseComponentFromName("SmokeParticle"):setActivated(true);
else
thisPlayer:getParticleUniverseComponentFromName("SmokeParticle"):setPlaySpeed(20);
end
if (energy:getValueNumber() <= 0) then gameOverText:setActivated(true); thisPlayer:getParticleUniverseComponentFromName("ExplosionParticle"):setActivated(true); thisPlayer:setVisible(false); end --log("----->Dump: " .. dump(felsites));
if (thisEnemy:getTagName() ~= "Boss") then
thisEnemy:getPhysicsActiveComponent():setCollidable(false);
thisEnemy:setVisible(false);
thisEnemy:getPhysicsActiveComponent():translate(Vector3(0, -5, 0));
--thisEnemy:setScale(Vector3(0.1, 0.1, 0.1));
thisEnemy:getSimpleSoundComponent():setActivated(true);
thisEnemy:getParticleUniverseComponentFromName("ExplosionParticle"):setActivated(true);
thisEnemy:getPhysicsActiveComponent():setActivated(false);
-- Do not delete directly, because a particle effect needs time to play
AppStateManager:getGameObjectController():deleteDelayedGameObject(thisEnemy:getId(), 3);
end
end
If we did not hit the boss ('thisEnemy:getTagName() ~= "Boss"'), we destroy the enemy, (asteroid, other enemy ship etc.).
New is the function 'OnLaserShieldContactOnce':
Level1_MainGameObject["onLaserShieldContactOnce"] = function(gameObject0, gameObject1, contact)

    local thisLaser = nil;

    local thisShield = nil;
if gameObject0:getCategory() == "Laser" then
thisLaser = gameObject0;
thisShield = gameObject1;
else
thisLaser = gameObject1;
thisShield = gameObject0;
end
local eventData = {};
eventData["laserId"] = thisLaser:getId();
AppStateManager:getScriptEventManager():queueEvent(EventType.RemoveLaser, eventData);
thisLaser:getPhysicsComponent():setCollidable(false);
boss1ShieldAttributeEffect:setActivated(true);
boss1ShieldEnergy:setValueNumber(boss1ShieldEnergy:getValueNumber() - 10);
if (boss1ShieldEnergy:getValueNumber() <= 0) then
log("-->no shield anymore");
thisShield:getPhysicsComponent():setCollidable(false);
thisShield:setVisible(false);
--AppStateManager:getGameObjectController():deleteGameObjectWithUndo(thisEnemy:getId());
end
end
In this case, as usual we remove the laser and activate the shield attribute effect and reduce the energy of the shield. The shield has by default in this example 30 energy points. That means, if the shield is hit 3 times, it will be deactivated and will no more collide, so that the actual boss ship can be hit.
After that we react if our ship did collide with the shield itself:
Level1_MainGameObject["onPlayerShieldContactOnce"] = function(gameObject0, gameObject1, contact)

    local thisPlayer = nil;

    local thisShield = nil;
-- Decrease energy
if gameObject0:getCategory() == "Player" then
thisPlayer = gameObject0;
thisShield = gameObject1;
else
thisPlayer = gameObject1;
thisShield = gameObject0;
end
energy:setValueNumber(energy:getValueNumber() - 10000);
checkGameOver();
end
Here we check for game over, because if the our ship collided, we subtract 10000 of energy! No ship can take it!
Thats it for the main game object.
Next we will concentrate on the laser scripts of the boss ship.
We will use one script for those two cannons, since they will be doing the same.
I will repeat, what we have done above, in order to increase understanding of the script creation.
For that, select one cannon and create a lua script component. Important: Set 'Has Common Script' to true.
The corresponding script file will be created. Now select the other cannon. Again, create a lua script component, activate also the 'Has Common Script' and now important, specify the same script name, as the script name of the other cannon.
If somehow there are two scripts, delete on script, and try again.
Open the script e.g. in ZeroBrane studio and specify the following script variables:
originLaser = nil;

leftLaserSpawnComponent = nil;

rightLaserSpawnComponent = nil;

thisGameObject = nil;

speed = 100
In the 'connect' function, we will get the orignal laserand the two spawn components:
SpaceGun2_2["connect"] = function(gameObject)

    thisGameObject = gameObject;

    originLaser = AppStateManager:getGameObjectController():getGameObjectFromId("791472684");

    originLaser:setVisible(false);

    leftLaserSpawnComponent = thisGameObject:getSpawnComponentFromName("LeftLaserSpawn");

    leftLaserSpawnComponent:setKeepAliveSpawnedGameObjects(true);

    rightLaserSpawnComponent = thisGameObject:getSpawnComponentFromName("RightLaserSpawn");

    rightLaserSpawnComponent:setKeepAliveSpawnedGameObjects(true);

end
Note: The variable 'thisGameObject' is each original cannon reference, since we are using one scripts for two cannons.
In the 'disconnect' function we reset everything.
SpaceGun2_2["disconnect"] = function()

    originLaser:setVisible(true);

    leftLaserSpawnComponent:setActivated(false);

    rightLaserSpawnComponent:setActivated(false);

    thisGameObject:getJointHingeActuatorComponent():setActivated(false);

    thisGameObject:setVisible(true);

end
Note, we created in the picture 'boss1Cannon' the lua spawn function 'onLaserSpaceGunSpawned'. This one will always be triggered, when a laser is spawned:
SpaceGun2_2["onLaserSpaceGunSpawned"] = function(spawnedLaserGameObject, originGameObject)

    spawnedLaserGameObject:setVisible(true);

    --Note: Laser gun has different height as the player, hence move the laser in  y = 0 in order to be able to hit the player

    local directionCanon = originGameObject:getOrientation() * originGameObject:getDefaultDirection();

    -- Laser is kinematic component!

    spawnedLaserGameObject:getPhysicsActiveComponent():setVelocity(Vector3(directionCanon.x, 0, directionCanon.z) * speed);

end
In this function, we let the laser fly in the direction of the cannon, which is the 'originGameObject'. Our laser is a kinematic component, hence no forces will take place and we can use physics 'velocity' functions instead of 'force' functions.
In order to be able to hit our future fighter jet, we set the y-component to zero. If you are testing the scenario, alsways take a look of a different camera view, if the laser can hit our space ship and control the y-coordinate of the future fighter jet!
Boss ai
In this chapter we will create the artificial intelligence for the boss. We will use a state machine, each state will have its sphere of action. We will use the boss lua script and describe the states in lua.
We will have the following states:
- AppearState: The boss will appear into the viewport via path follow mechanics.
- ShootState: This state will be run simultanously with the other states and will be switched on and off on demand.
- Move1State: The ship will move from left to right and vice versa and shoot at the player.
- Move2State: A 'MothMathFunctionComponent' will be used, to create a circular movement of the boss.
- Move3State: The boss will chase the player.
If not already created, create a 'LuaScriptComponent' and 'AiLuaComponent', deactivate the ai lua component and set as 'Start State Name' the name 'AppearState'. This will be the first state, that is executed, as soon the simulation starts and this component is activated.
In the lua script we need some variables:
boss1 = nil

aiLuaComponent = nil;

boss1LeftCanon = nil;

boss1RightCanon = nil;

moveMathFunctionComponent = nil;

energy = nil;
At the end of the day, all variables reference what we need for our boss ai.
Next create the 'connect' function for initialization of everything.
Level1_MotherShip2_0 = {}
Level1_MotherShip2_0["connect"] = function(gameObject)
boss1 = AppStateManager:getGameObjectController():castGameObject(gameObject);
aiLuaComponent = boss1:getAiLuaComponent();
moveMathFunctionComponent = boss1:getMoveMathFunctionComponent();
energy = boss1:getAttributesComponent():getAttributeValueByName("Energy");
energy:setValueNumber(100);
boss1:getValueBarComponent():setCurrentValue(100);
boss1:getGameObjectTitleComponent():setCaption("100%");
boss1LeftCanon = AppStateManager:getGameObjectController():getGameObjectFromId("2663873632");
boss1RightCanon = AppStateManager:getGameObjectController():getGameObjectFromId("2673984934");
-- Difference between NONE and STOP.
-- If none is on, add no force, so that other behaviors can still move the agent! Only stop adds force, even if its null
aiLuaComponent:getMovingBehavior():setBehavior(MovingBehavior.STOP);
aiLuaComponent:getMovingBehavior():setGoalRadius(2);
aiLuaComponent:getMovingBehavior():setStuckCheckTime(1);
aiLuaComponent:getMovingBehavior():setAutoOrientation(false);
end
We want to deactivate the auto orientation of our boss ship, when its being moved and we set the goal radius to 2 meters, because its a huge ship and if the radius is to small, it may happen, that the ship never reaches the goal! We also use a stuck check time, that is if the boss cannot reach the goal for one second its current behavior will be removed. This of course should not happen. But play around with those values.
Note: Remember to use the name of your boss ship, in this case its 'Level1_MotherShip2_0'. Also your left and right cannon may have a different id, as in this tutorial.
Note: Difference between behavior NONE and STOP: If none is on, no force is added, so that other behaviors can still move the agent! Only stop adds force, even if its null.
Next, we reset in the 'disconnect' function everything again.
Level1_MotherShip2_0["disconnect"] = function()

    boss1:setVisible(true);

    boss1OldPosition = boss1:getPhysicsActiveComponent():getPosition();

    boss1OldOrientation = boss1:getPhysicsActiveComponent():getOrientation();

    aiLuaComponent:setActivated(false);

    moveMathFunctionComponent:setActivated(false);

    boss1:getValueBarComponent():setCurrentValue(100);

    energy:setValueNumber(100);

    boss1:getGameObjectTitleComponent():setCaption("100%");

    boss1:getSimpleSoundComponent():setActivated(false);

    boss1:getParticleUniverseComponent():setActivated(false);

    boss1:getGameObjectTitleComponent():setActivated(false);

end
Now we start with our first state:
AppearState
AppearState = {}
AppearState["enter"] = function(gameObject)
log("Enemy Enter AppearState: " .. gameObject:getName());
aiLuaComponent:getMovingBehavior():getPath():addWayPoint(Vector3(-30, 0, -70));
aiLuaComponent:getMovingBehavior():setBehavior(MovingBehavior.FOLLOW_PATH);
aiLuaComponent:reactOnPathGoalReached(boss1, "AppearEndReached", nil);
end
AppearState["exit"] = function(gameObject)
--aiLuaComponent:getMovingBehavior():setBehavior(MovingBehavior.NONE);
end
Each state has an enter, an update and an exit function and its possible to create transitions between states, which causes, that exit is called on the prior state and then enter on the new state.
In this state the boss shall appear in the screen. Hence one waypoint is added, so that the boss will appear top down. We also will react, when the boss reached the goal via 'AppearEndReached' callback function.
In this case we switch to 'MoveState1'.
Level1_MotherShip2_0["AppearEndReached"] = function(hitGameObject)

    log("[Lua]: AppearEndReached");

	aiLuaComponent:changeState(MoveState1);

end
MoveState1
MoveState1 = {}
MoveState1["enter"] = function(gameObject)
log("Enemy Enter MoveState1: " .. gameObject:getName());
aiLuaComponent:setGlobalState(ShootState);
aiLuaComponent:getMovingBehavior():getPath():addWayPoint(Vector3(boundsLeft + 10, 0, -70));
aiLuaComponent:getMovingBehavior():getPath():addWayPoint(Vector3(boundsRight - 10, 0, -70));
aiLuaComponent:getMovingBehavior():getPath():addWayPoint(Vector3(0, 0, -70));
aiLuaComponent:getMovingBehavior():setBehavior(MovingBehavior.FOLLOW_PATH);
aiLuaComponent:reactOnAgentStuck(boss1, "AgentStuck", nil);
aiLuaComponent:reactOnPathGoalReached(boss1, "PathGoalReached", nil);
end
MoveState1["exit"] = function(gameObject)
aiLuaComponent:getMovingBehavior():setBehavior(MovingBehavior.NONE);
end
In this state, the boss will move from left to right. For testing purposes we also a callback function 'AgentStuck', which never should happen and 'PathGoalReached', if the boss traversed all 3 waypoints.
Level1_MotherShip2_0["PathGoalReached"] = function(hitGameObject)

    log("[Lua]: PathGoalReached");

	aiLuaComponent:changeState(MoveState2);

end
Level1_MotherShip2_0["AgentStuck"] = function(hitGameObject)
log("[Lua]: AgentStuck");
aiLuaComponent:getMovingBehavior():setBehavior(MovingBehavior.STOP);
end
If 'PathGoalReached' is called we switch to the next state 'MoveState2'.
MoveState2
MoveState2 = {}
MoveState2["enter"] = function(gameObject)
--log("Enemy Enter MoveState2: " .. gameObject:getName());
moveMathFunctionComponent:setActivated(true);
moveMathFunctionComponent:reactOnFunctionFinished(boss1, "CircleFunctionFinished", nil);
end
MoveState2["exit"] = function(gameObject)
moveMathFunctionComponent:setActivated(false);
end
In this state, we use the move math function, we defined in NOWA-Design, which will let the boss move in a circle. If the function is finished, again we will react.
Level1_MotherShip2_0["CircleFunctionFinished"] = function(hitGameObject)

    log("[Lua]: CircleFunctionFinished");

	aiLuaComponent:changeState(MoveState3);

end
In this case, we change the current state to the new state 'MoveState3'.
Note:The exit function of the current state is called, which deactivated the move math component. This is important!
MoveState3
MoveState3 = {}
MoveState3["enter"] = function(gameObject)
--log("Enemy Enter MoveState3: " .. gameObject:getName());
boss1:getPhysicsActiveComponent():setSpeed(30);
local player = AppStateManager:getGameObjectController():getGameObjectFromId("2248180869");
aiLuaComponent:getMovingBehavior():getPath():addWayPoint(player:getPosition());
aiLuaComponent:getMovingBehavior():setBehavior(MovingBehavior.FOLLOW_PATH);
aiLuaComponent:reactOnPathGoalReached(boss1, "PathGoalReached2", nil);
end
MoveState3["exit"] = function(gameObject)
boss1:getPhysicsActiveComponent():setSpeed(15);
end
The player ship is received from the given id and added as waypoint. So the boss will move where the player was at that point. If the goal has been reached, we will get back to the 'MoveState2' and loop the states again, until the boss is destroyed.
Thats it with the boss ai! Next, if the boss has been destroyed I will describe, how to switch to level2.
Instead of starting the level 2 directly, you could create another state called 'SummaryState' and list, what the player has accomplished in this level.
Level 2
We will only touch on the level 2, because it would be to much for this tutorial. But feel free to extend this tutorial and build your own game!
We will remove everything but the asteroids and let them fly with more speed.
Note: Its a good idea, to go into the 'media/projects' folder and copy the 'SpaceGame' folder. Because you never know...
For that open the 'level1.scene'. Go to 'File' and press the 'Copy Scene' button. Set the name 'level2' in the 'SpaceGame' folder.
Go to 'File' and open 'Level2.scene'.
Note: Copying the current scene is the best option, because all ids will remain intact, as all our lua scripts are using the ids etc. If you still want to let e.g. your asteroids behave differently, just set a different lua script for your asteroids with different behavior in there.
Select the 'MainGameObject', goto 'TimeLineComponent' and set the 'Time Point Count' to just 1, so that only the asteroids will be triggered.
Remove the boss, ufo, health package, enemy laser from the scene.
Select the 'MainCamera' and set a different background for the 'BackgroundScrollComponent', e.g. 'space2.jpg'.
Also do not forget to save the scene frequently.
Until now the main game object is using the lua script from level1. But if you want different behavior, specify another lua script called 'Keyhole.lua'.
Start the simulation, in order to create the script.
Open the script in 'ZeroBrane' studio and remove everything but with asteroids and the future fighter jet and the player attributes like energy etc.
module("Keyhole", package.seeall);

-- physicsActiveComponent = nil;

Keyhole = {}
-- Scene: Level2
require("init");
thisGameObject = nil
originAsteroid = nil;
asteroidSpawn = nil;
energyProgress = nil;
scoreText = nil;
energy = nil;
score = nil;
gameOverText = nil;
timeLine = nil;
fighterJet = nil;
function init()
fighterJet:getPhysicsComponent():setCollidable(true);
asteroidSpawn:setActivated(false);
gameOverText:setActivated(false);
-- Set default values, and if maybe a game is loaded, the values will be overwritten
energy:setValueNumber(100);
score:setValueNumber(0);
energyProgress:setValue(energy:getValueNumber());
scoreText:setCaption("Score: " .. toString(score:getValueNumber()));
end
function checkGameOver()
if (energy:getValueNumber() <= 0) then
gameOverText:setActivated(true);
fighterJet:getParticleUniverseComponentFromName("ExplosionParticle"):setActivated(true);
fighterJet:setVisible(false);
fighterJet:getPhysicsComponent():setCollidable(false);
end
end
function levelCleared()
thisGameObject:getCompositorKeyholeComponent():setActivated(true);
local keyholeAttributeEffect = thisGameObject:getAttributeEffectComponent();
keyholeAttributeEffect:reactOnEndOfEffect(thisGameObject, "LevelClearedEffect", false);
keyholeAttributeEffect:setActivated(true);
end
Keyhole["LevelClearedEffect"] = function(result)
AppStateManager:popAppState();
end
Keyhole["connect"] = function(gameObject)
thisGameObject = AppStateManager:getGameObjectController():castGameObject(gameObject);
asteroidSpawn = thisGameObject:getSpawnComponentFromName("asteroidSpawn");
asteroidSpawn:setKeepAliveSpawnedGameObjects(true);
healthSpawn = thisGameObject:getSpawnComponentFromName("healthSpawn");
fighterJet = AppStateManager:getGameObjectController():getGameObjectFromId("2248180869");
energy = fighterJet:getAttributesComponent():getAttributeValueByName("Energy");
score = fighterJet:getAttributesComponent():getAttributeValueByName("Score");
energyProgress = thisGameObject:getMyGUIProgressBarComponent();
energyProgress:setValue(energy:getValueNumber());
scoreText = thisGameObject:getMyGUITextComponentFromName("ScoreText");
scoreText:setCaption("Score: " .. toString(score:getValueNumber()));
gameOverText = AppStateManager:getGameObjectController():getGameObjectFromId(MAIN_GAMEOBJECT_ID):getMyGUITextComponentFromName("GameOverText");
-- Load a possible save game
local success = AppStateManager:getGameProgressModule():loadProgress(Core:getCurrentSaveGameName());
originAsteroid = AppStateManager:getGameObjectController():getGameObjectFromId("2557366868");
originAsteroid:setVisible(false);
originAsteroid:getPhysicsActiveComponent():translate(Vector3(0, -5, 0));
timeLine = thisGameObject:getTimeLineComponent();
init()
end
Keyhole["disconnect"] = function()
init()
originAsteroid:setVisible(true);
timeLine:setCurrentTimeSec(0);
end
Keyhole["onAsteriodTimePoint"] = function(timePointSec)
asteroidSpawn:setActivated(true);
end
Keyhole["onAsteroidSpawned"] = function(spawnedGameObject, originGameObject)
spawnedGameObject:getPhysicsComponent():setCollidable(true);
spawnedGameObject:setVisible(true);
spawnedGameObject:getPhysicsActiveComponent():setPosition(Vector3(math.random(-100, 100), 0, -150));
spawnedGameObject:getPhysicsActiveComponent():setOrientation(Quaternion(Degree(math.random(180)), Vector3.UNIT_Y));
local direction = Vector3(math.random(-0.5, 0.5), 0, math.random(1));
spawnedGameObject:getPhysicsActiveComponent():applyRequiredForceForVelocity(direction * 100);
end
Keyhole["onLaserSpawned"] = function(spawnedLaserGameObject, originGameObject)
spawnedLaserGameObject:getPhysicsComponent():setCollidable(true);
local laserBillboard = spawnedLaserGameObject:getBillboardComponent();
laserBillboard:setActivated(true);
local shootSound = spawnedLaserGameObject:getSimpleSoundComponent();
shootSound:setActivated(true);
spawnedLaserGameObject:getPhysicsActiveComponent():applyRequiredForceForVelocity(Vector3(0, 0, -100));
end
Keyhole["onEnemyLaserContactOnce"] = function(gameObject0, gameObject1, contact)
contact = AppStateManager:getGameObjectController():castContactData(contact);
local thisLaser = nil;
local thisEnemy = nil;
if gameObject0:getCategory() == "Enemy" then
thisEnemy = gameObject0;
thisLaser = gameObject1;
else
thisEnemy = gameObject1;
thisLaser = gameObject0;
end
local eventData = {};
eventData["laserId"] = thisLaser:getId();
AppStateManager:getScriptEventManager():queueEvent(EventType.RemoveLaser, eventData);
thisLaser:getPhysicsComponent():setCollidable(false);
thisEnemy:getPhysicsComponent():setCollidable(false);
thisEnemy:setVisible(false);
thisEnemy:getPhysicsActiveComponent():translate(Vector3(0, -5, 0));
thisEnemy:getSimpleSoundComponent():setActivated(true);
thisEnemy:getParticleUniverseComponentFromName("ExplosionParticle"):setActivated(true);
thisEnemy:getPhysicsActiveComponent():setActivated(false);
AppStateManager:getGameObjectController():deleteDelayedGameObject(thisEnemy:getId(), 3);
score:setValueNumber(score:getValueNumber() + 20);
scoreText:setCaption("Score: " .. toString(score:getValueNumber()));
end
Keyhole["onPlayerEnemyContactOnce"] = function(gameObject0, gameObject1, contact)
local thisPlayer = nil;
local thisEnemy = nil;
-- Decrease energy
if gameObject0:getCategory() == "Player" then
thisPlayer = gameObject0;
thisEnemy = gameObject1;
else
thisPlayer = gameObject1;
thisEnemy = gameObject0;
end
if (thisEnemy:getTagName() == "Stone") then
energy:setValueNumber(energy:getValueNumber() - 2);
elseif (thisEnemy:getTagName() == "Ship1") then
energy:setValueNumber(energy:getValueNumber() - 5);
end
energyProgress:setValue(energy:getValueNumber());
if (energy:getValueNumber() < 50 and energy:getValueNumber() > 20) then
thisPlayer:getParticleUniverseComponentFromName("SmokeParticle"):setActivated(true);
else
thisPlayer:getParticleUniverseComponentFromName("SmokeParticle"):setPlaySpeed(20);
end
if (energy:getValueNumber() <= 0) then gameOverText:setActivated(true); thisPlayer:getParticleUniverseComponentFromName("ExplosionParticle"):setActivated(true); thisPlayer:setVisible(false); end thisEnemy:getPhysicsActiveComponent():setCollidable(false); thisEnemy:setVisible(false); thisEnemy:getPhysicsActiveComponent():translate(Vector3(0, -5, 0)); thisEnemy:getSimpleSoundComponent():setActivated(true); thisEnemy:getParticleUniverseComponentFromName("ExplosionParticle"):setActivated(true); thisEnemy:getPhysicsActiveComponent():setActivated(false); -- Do not delete directly, because a particle effect needs time to play AppStateManager:getGameObjectController():deleteDelayedGameObject(thisEnemy:getId(), 3); end
Press the start button and notify, that there are still some lua bugs. Open the lua errors dialog and read carefully. There are still some enemy laser zombies etc.
Go to the game object tree and remove the spacegun1 and spacegun2. We did not see them in the scene, because they are invisible.
Now I will show you how to work with more hard lua errors, which will cause lua to panic.
See NOWA_Design for further details or log. For that go to '..\bin\resources' folder and open the 'NOWA_Design_ogre.cfg.log' file and scroll down. Those message should appear:
11:24:38: [LuaScriptApi]: Lua panic has been called, which is a fatal error.

11:24:38: [LuaScript] Caught error in script: 'Level2_MainGameObject.lua' in 'callTableFunction' for function name: 'connect' Error: lua runtime error details: nil

11:24:40: [LuaScriptApi]: Lua panic has been called, which is a fatal error.

11:24:40: [LuaScript] Caught error in script: 'Level2_MainGameObject.lua' in 'callTableFunction' for function name: 'disconnect' Error: lua runtime error details: nil
Unfortunately for us, if lua caused a panic, its impossible to see in which line the error occured. But we know the script and at least the function.
Now print log messages in the 'connect' function, in order to see, until which line of code everything worked fine.
Thats it. Now save the scene and open the 'Level1_MainGameObject.lua', because we need to switch to level2 if level1 has been cleared.
For that, go to the function 'LevelClearedEffect', remove 'AppStateManager:popAppState();' and set 'AppStateManager:getGameProgressModule():changeWorld('Level2');'.
--> Dann kommen separat das Intro und die Menüs und speichern und Laden des Spiels...

Level2
In order to show scene switch during runtime, we will create a level 2 if the first boss space ship has been destroyed. Note: As an exercise, you could create x-own levels and its adviced to create all those scene for the GameState and just switch the levels via the GameProgressModule. This will keep memory low and increase performance. That means, its not necessary to create 50 AppStates (each for one level), just use the default GameState and load switch the scenes. After switching a scene, each time, all prior resources will be destroyed. The intro and menu has been created in own states, because they are totally different to the levels and because it was desired, to interrupt the game, go to menu, do some configuration, save the game and then continue. Hence the menu state will only be destroyed, if the whole game has been exited!
Ok, thats it with the game tutorial. Next lets create the intro and whole menu, in order to load and save a game state. Click here.